This is part 2 of the house upgrades round up and what they cost. If you missed part 1 you can CLICK HERE.
- Premade shower pans- $600-$2,000
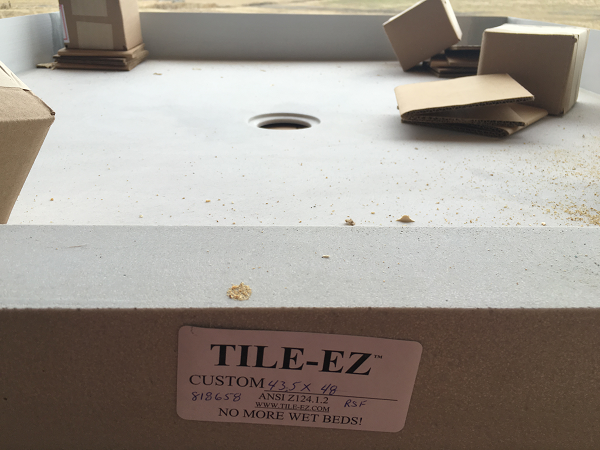
We looked at a few options for shower pans that you could put tile over, but ultimately I wanted to never have to worry about them leaking. Making a pan yourself is quite a bit cheaper, but there is a higher risk you will have cracking or leaks especially if you are a beginner like I am. Farmer and I wanted this house to be built WELL so that we didn’t have to go through and re do anything for many years.
There are standard white shower bottoms you can buy that are between $200-$500 but they can not be tiled over.
If you make your own you can do it for as cheap as $100-$300 depending on what materials you use.
If you hire someone to make a shower pan for you, the labor will make up for the money saved and it will still end up costing you $500-$1000.
To purchase a pre-made shower pan that can be tiled over, it cost us $600 for the small one (3’x3′) and $1000 for the large custom sized one (4’x 4.5′) The really large custom ones with built in benches were between $1200-$2000. You can check these all out at http://www.tile-ez.com/ or call John directly at 215-603-4300 and tell him the Farmer’s Wife sent you, he will take care of you.
Another huge bonus of these were how easy they were to put in. It literally took us less than 5 minutes to install with no mess or clean up. This particular upgrade was worth it to me to not have to worry about the leaks.
2. 9 foot ceilings- $8500
This is a really tricky one to put a price on. First I will say that I LOVE my 9 foot ceilings. They make the entire house seem so much bigger.
Here are the things that have to be upgraded just to put in an extra foot of wall above the standard 8 feet.
- Taller 2×6’s to frame the house with ($2,000)
- Taller beams around the porches and exterior ($1000)
- Extra insulation to fill the top foot ($800)
- Larger drywall boards ($1000)
- More paint and texture ($400)
- More siding/rock/exterior coverings ($2000)
Then there are other small things you don’t normally think of like how many electrical wires have to come down an extra foot to the outlets on the floor. Whether or not you make your windows larger to fill the wall space. Extra space that has to be heated and cooled.
Over all, this upgrade was an expensive one. But to be fair, it was throughout the ENTIRE house. That’s over 4,000 square feet that we needed extra of everything to make it all 1 foot taller.
Total cost for us to raise our ceilings 1 foot was about $8500.
3. Painted windows- $75-$100 each
Farmer and I have agreed for a very long time that having black trimmed windows on the outside of our house was very important to us. Personal style, it’s okay you don’t have to agree. Anyways, what we found out was that most companies don’t manufacture black windows, but they will paint them for you. Windows standardly come in white, off white, and sometimes brown, but if you want a different color than those you will probably have to pay extra.
Each of our standard sized windows (that were very energy efficient which raised the price a lot too) were $300-$400 and I was told that painting the exterior was between $75-$100 per window.
Our home has 25 windows so to have them painted cost us about $2,200. Worth it to me!
4. Extra can lights- $30 each
Oh man do I love lights! We did our research ahead of time very well on this one before deciding that we wanted a lot of extra lights in our house. I also love can lights, and I love things to be simple and easy. Therefore, we decided to just fill our entire house with tons of can lights. Easy peasy, but more expensive.
Many electricians charge you per light, making it easy to determine how much you are adding by throwing in a few more lights. We put our own in (with the help of an electrician friend), so these prices are what it costs to add more can lights yourself.
- Can light housing (the big metal piece that hides up in your ceiling) – $20
- Light bulb – $4
- Trim – $7
Therefore, each additional can light you add to your house costs you just over $30. We added at least 20 EXTRA can lights, equaling $600. Then you have a little added cost for more wire and more time.
5. LED lights- $4 more expensive for each bulb
I am including this right after extra can lights because at the last minute we decided to just go straight LED from the get go.
Did you know LED bulbs are supposed to last 20 years?!?! In comparison to standard incandescent light bulbs lasting 1-2 years…… hmmmm.
LED bulbs (we didn’t do any special housing or trim, just the bulbs) are about twice the price of a incandescent. Well let’s do the math here….. Yep it’s worth it.
Since incandescent bulbs cost about $4, each LED bulb added another $4. We had about 140 can lights to fill. That equals $560 …. and …. I don’t have to change a light bulb for 20 YEARS!!!!
6. Spray foam insulation- $2,000 in kits and $2,000 in labor
Alright, last one for today is spray foam insulation. Standard type of wall insulation in my area is batting strips that you simple fit into your wall cavity and your done. The weakness that these have is that if they don’t fit perfectly, they allow air to flow in the cracks around them. They are also compromised if you have to squish them around anything because their insulation value is in the air pockets they have when they are fully “fluffed”.
Spray foam insulation is becoming more and more popular because it creates a barrier that air can not pass through. It expands into cracks and eliminates leaks. It also has a much better water barrier than batting. Basically it fills everything in, holds it all together like glue, and won’t let air or water pass through. Plus it has a higher R-value in a thinner application than the other types of insulation.
Seems like the obvious choice right? The problem is the price tag. We debated FOREVER on whether or not to use spray foam. Ideally what we wanted to do was a certain method where you spray foam everything 3/4″ thick, and then still put batting on top of that. This allows us the benefits of spray foam, but keeps the price down by filling the rest of the wall cavity with batting.
We almost didn’t do it guys. The quote for batting was HALF the price of what it would cost us to do spray foam and batting together. If for some reason we chose to do 100% spray foam (which no one does because you get the benefits with just 3/4″) it would have quadrupled the price. Wow!
We ended up buying the bare minimum of spray foam. We knew we would run out, we just hoped we would get around the three windy sides of the house and part of the fourth wall which was shared with the garage before it went kaputz.
Each spray foam kit, which allows you to do it yourself, covered approximately 600 square feet of 1 inch thick spray foam. Each kit cost around $650.
We have a ton of huge windows (no insulation required there) so we needed almost four spray foam kits. We went with three, and did all the work ourselves.
The work itself was quoted at $2,000, ouch! DIY was definitely the way to go this time (we did it in half a day).
3 kits x $650 = $1,950
As a final note though, I am SOOO glad we went ahead and did it. This is NOT something you can do later! Unless you want to rip your walls apart. I love that we can’t hear the wind through our walls. I love that we have a better moisture barrier. I love that we have a higher R-value. Yep, it was worth it to me and I would do it again.
CLICK HERE to read part 3 of this little series.
Everybody has told me how helpful the real numbers are and begged for more, so I will keep pumping them out!
~Farmer’s Wife
FREE checklists and schedules
Access to the resources I created that helped Farmer and I save over $75,000 building our own custom dream home.
Thank you so much for these posts! Pastor and I are looking at building our first home and we are totally naive when it comes to the actual costs of these small little “extras” that we need to account for before we even apply for the permits or the loan. Keep these tidbits coming!
Luke 14:28-30; Psalm 127:1
You are welcome Pastor’s Wife!
I love reading posts from people who think like me. 😉 You will never regret these upgrades. We went with 9 foot ceilings, too. And it was worth every single penny. We also did 9 foot ceilings in the basement (which we are finishing right now) and it is amazing what a difference it makes. I also think because our home is smaller overall, the tall ceilings make even bigger of an impact.
Ryan joked that when I was placing lights in the house, that I wanted the house to be seen on the moon. 😉 I like having plenty of lights – and I didn’t want to deal with dark corners or rooms. We put in more can lights than most new construction and it was worth every penny. (Even though Ryan told me that when he bought the wire to run all the wiring, the electrical store had some high eyebrows.)
Hahaha I love it! More lights, always more lights!! We all get weird looks anyways, why not make it worth it!
And dimmer switches! i wish I had dimmer switches on every single light switch! 😀
Such a great idea – and definitely something to keep in mind!
This is great! Thank you! I have a quick question about your ceilings! We want to do higher feelings but how do you know how high they need to be? We are doing a large open area (kitchen, dining area and family room) all together and don’t want the ceilings to feel too low for such a big room. We were thinking 10 feet but would that be too cavernous? I don’t want to do them too high so I’d love it if 9 ft would work!
(Also, signed up for PYH today! So excited! I’m so glad I found your site a few weeks ago.)
9 feet feels very spacious to me. Standard is 8 feet so it feels noticeably higher in my opinion. My neighbor has a great room over 1000 square feet and the entire thing is 8 foot ceilings. Maybe it is because I am used to it, but it doesn’t feel like the ceilings are too low in there. But no matter what you decide to do, I highly suggest finding a home that has 10 foot ceilings so you can really see what they feel like before making your final decision.
That being said, I LOVE high ceilings. They instantly make the room feel way bigger. I told the guys to go as high as they could with the vaults in my great room and I absolutely love it. The room is a little over 1000 square feet (with living, kitchen, and dining combined) and the highest peak is 15 feet.
Thank you!
Thank you so much for all this helpful info! I just love your blog! I’m in the hiring stage now so I reference your posts a lot! I’d love to know where you got the spray foam insulations kits from?! We definitely want to have it well insulated and if we can do it ourselves so easily that’s a huuge bonus! Thank you!
Blue Seal Building Supply is where I got all of my insulation. I LOVED them! They were cheaper, friendly, they explained everything to me, and they delivered everything for way cheap.
The spray foam insulation was even easier than we thought it would be. And you don’t hear that very often in construction! haha. Anyone can do it! But you can’t have kids nearby while spraying it, just an fyi.
Thank you SO much! 🤗
Do you think the 9′ ceiling upgrades are necessary if we are having vaulted or step up Ceilings? Seems silly to add the extra expense if they will be taller already, thoughts?
No I don’t think 9 foot is necessary. Are you vaulting or stepping up everything? Just consider what rooms may or may not have a vault or a step up. 8 feet is a perfectly fine height, I just personally prefer 9 because I like the open feeling.
Thank you for all your tidbits. They really make sense. Hubby and I are just starting on our build, and I read what you wrote about foam insulation. You said that you were able to diy it for 1950.00 and your quote was for $2,000.00. Wouldn’t it be worth it for someone else to do it for an extra 50.00?
Oh shoot I must not have worded that clearly, I will fix it! What I meant was that the quote was $2,000 just for the labor. So it would have been $2,000 in labor plus $1950 in supplies. We saved the $2000 in labor by doing it ourselves and it only took Farmer and I part of one day to do it.