First steps toward owner building your dream home…
Permits and applications
**These experiences are based in Norfolk County, Massachusetts. Each county requires different things for owner building. Please check with your local building department for rules and information regarding your specific area.
You can also check out the Farmer’s wife’s permit experiences and information based in Grant County, Washington by CLICKING HERE.

Congratulations you just closed papers on your brand new lot of land! As you clink your glasses of champagne while sitting on a rock under a scrappy old pine tree with your partner; you look out as if you were already sitting on your front porch, envisioning your dream home and you ask yourselves what’s next?
But really, what are the next steps to achieving your goals of owner building a home designed just for you?
Here is what we did to get us on the path to building our very own dream home.
Step One
Make an appointment to speak with your local town or city hall.
This is the very first place we started since we knew we needed permits before being able to do any work at all. Lucky for us our town hall is 5 minutes down the road from our current residence, we paid them so many visits.
You can also look online, since most towns have the permit information on their website. Our town did have some information but the best source was directly speaking with each department about the list of items that needed to be accomplished before the permits could even be submitted.
First stop was the Engineering department for us, this could be different for your local administration. They gave us a packet of information that had to be filled out and taken care of mostly by a certified civil engineer. The lady who receives and processes all the paperwork for our Engineering department told us the first step would be finding and hiring a Civil Engineer. We asked if they had a list of contractors they could recommend, and of course the politically correct response was that they don’t recommend anyone over the other but can give us a list of contractors they had seen used in the past.
Step Two
Hire a Civil Engineer.
Hopefully you can do this based on a recommendation from a trusted source. We already knew the contractor we would be working with to excavate and clear our land. He had given us an estimate on what it would cost to do the work before we signed any papers on the lot. He is a professional who has done several hundred projects in our town alone, so we asked him for a reference. We also called a few other engineers on the list the town gave us in addition to the one that did the original subdivision on the lot we purchased.
For this contractor, because the materials were not a factor and there is a guideline from the town on what is required, we asked for a Not To Exceed Contract.
Not To Exceed or NTE is defined by buisnessdictionary.com as “the commitment by the vendor that the value of an interim estimate (plus contingency allowances) will not exceed the amount of the firm proposal and estimates to be submitted at a later date. A NTE value, however, may be adjusted upward or downward depending on the changes in the scope of work or in associated specifications.”
In other words, when we received the estimates back from the Engineers, that was what we could expect to pay for exactly what was on the proposal. No hidden fees or extras. There was an optional line for a Wetlands Scientist if we were required to bring one in, which we were. That did cost us extra, but we knew that ahead of time when planning for the budget. Our Civil Engineer came in lower than the others we got an estimate from and came with a recommendation from someone who had worked with him for a long time.
Step Three
Pass Board of Health requirements.
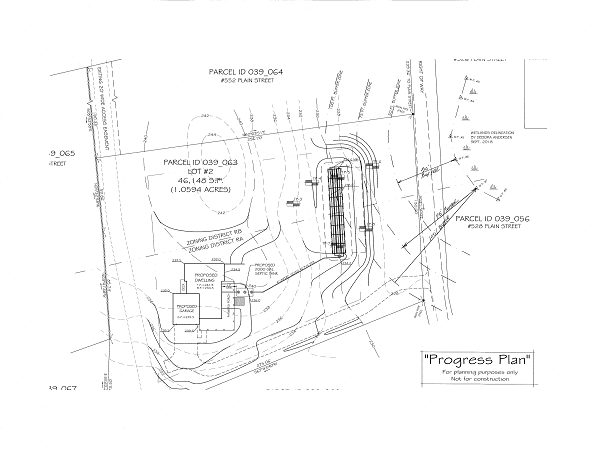
By hiring a Civil Engineer we also knocked out step three which was to have our septic system designed by a certified Civil Engineer and then approved by the Board of Health (aka BOH). We were told by the Engineering Department that we should wait to turn in the application until our Civil Engineer finished the plot plan and made any corrections required by them. This way we would not have to pay the BOH permit fee more than once. Hooray for saving money on fees!
Step Four
Finalize and print your drawings.
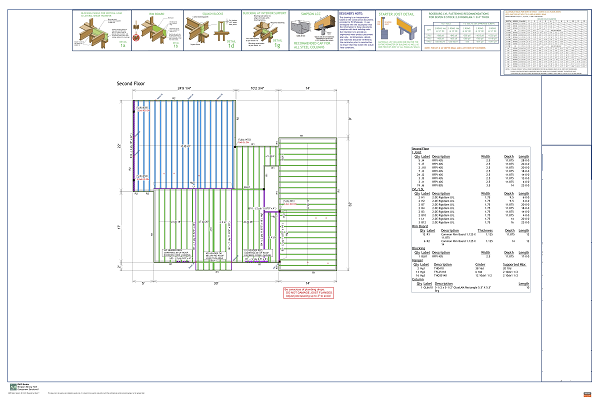
Get your dream home on paper with all the details! You are going to need a very detailed set of plans with finished drawings to turn into the various departments that need to sign off. This all has to be finalized BEFORE getting your building permits to pour a foundation. We needed our architect to give us a complete set of plans with details and the sealed calculations for us to print and submit to the Building Department, Engineering Department, Department of Public Works and Fire Department before we could get a permit.
What are Sealed Calculations, also known as structural drawings? This is done by a licenced Structural Engineer who provides structural drawings and calculations on the proper materials used to build the “bones” of your home. They determine the strength and stability of your home while providing an assessment of safety by providing specifications and calculations on the design and building materials.
We were required by our town, even though the State of Massachusetts does not require it, to provide these sealed calcs. We gathered that it was for a few reasons they wanted us to do it:
- We have a very open floor plan with just a few load bearing walls.
- We have beams that span 20 feet or more.
- We have a basement.
- We are inexperienced owner builders.
Check to see if your state or local building department requires you to have a stamped set of sealed calculations.
I will warn you that this can be an added expense as getting another professional engineer can be expensive. Sometimes your architect can do the sealed calcs for you if they are licenced and that could be included in your proposal when you work with them to do your drawings.
We DID NOT pay for our sealed calcs….
How did we manage this? We worked directly with our lumber company, Koopman Lumber, who we were buying our lumber, trusses, windows, doors, roofing, siding and deck materials from to include this service at NO COST to us! When we called around the average cost to have structural plans calculated it was between $300 and $600. Not a huge cost, but everything adds up.
Step Five
Have a HERS rating done on your home.
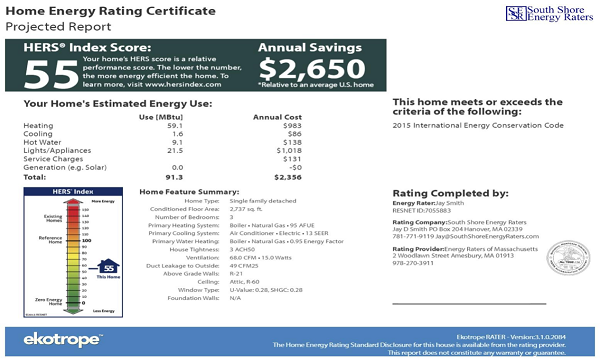
Once you have your plans drawn up and decide on the type of insulation along with a window and door schedule, you need to provide this for new construction. In the long run this will save you money and help the environment by measuring your home’s energy efficiency.
I know that we spend far more on heating and cooling now in our very charming antique Turn-of-the-Century Colonial than we will in our new very tight Farmhouse Colonial. Short of tearing down the plaster walls and blowing in foam insulation we have done everything we can to help with this. When winter storms come through, we can literally feel gusts of icy wind through the walls. Trust me, $300 a month on oil for 6 months out of the year cuts right to the very center of my soul… and that’s with setting our thermostat at 66 degrees Fahrenheit!
You can find a certified RESNET HERS rater through this nationally recognized system here on their website.
We used a recommendation for a very reliable rater and he was fast and easy to work with!
The way we currently have our new home planned we will be rated a 55 out of 100 on the scale. The lower the number the more energy efficient your home is! We hope to install solar at some point to get this number even lower in the future.
Step Six
Pass any special committees or hearings.
You want to get on your town or city’s agenda right away. We had to have a special hearing for the Wetlands that was less than 100 feet from our property line where work was to be done. Our Wetlands Scientist had to attend a town meeting to pass the Conservation Committee (aka Con Comm).They needed the Civil Engineer and Wetlands Scientist report before they would sign off on us even getting started on breaking ground. This is also why we started with the Civil Engineer first and because it took the longest to get checked off our list. It took from November when we turned in our paperwork to January to have a hearing to pass the Con Comm.

We also needed to have a hearing to be approved for a town water hookup. So we had to turn in our permit application to the Department of Public Works (aka DPW) and then get on another agenda so the board could approve our water connection.
So many agendas!
Step Seven
Have your plans stamped by the Fire Department.
Stop by and see your local friendly neighborhood Fire Chief.
You need to bring no less than 4 sets of the specified size plans with you to have the local fire department stamp them where the CO2 and smoke detectors will go.
You can have your architect include the locations on the plans or the Fire Chief will decide for you and stamp it on the plan. We called ahead to make sure he would be available to see us, rather than actually just stopping by.
Once the following departments signed off, we were able to pay our permit fees and get our permit to pour a foundation:
- Engineering Department
- Conservation Commission and Selectman
- Board of Health(Sewer or Septic)
- Department of Public Works and Selectman(Water)
- Fire Department
- Building Department
We will be honest, working with this many departments and all the people involved made for a long process in which we had to really cross our “t’s” and dot our “i’s”. We also needed to remain patient when following up or stumbling across roadblocks, like finding out in November that we wouldn’t be on the Selectmen’s board agenda until after the holidays, which was a month and a half later….
The permit and application process has been the longest and most challenging part of owner building, to us so far. Worker Bee is the most impatient person when he wants to get things accomplished and done, guess that’s the nature of a chef. There were days when we felt frustrated by the process and there were days we almost skipped out of the town hall, another day closer to getting our permit.
When you are working through all the red tape and inner workings of small town politics, it’s important to remember that they are doing their job to protect you in the building process. These departments and regulations are in place so that things are done correctly and your home is built as safely as possible.
This must be one of the reasons General Contractors get paid the big bucks, because this is a lengthy and time consuming process. Plus they already understand the lingo and requirements to quickly get through each step without having to go back for something that was missed. We do however, know extremely seasoned contractors that have done this dozens of times and still go through hoops and long waiting periods to get permits signed.
So trust us when we say, we felt so rewarded every time they would call and tell us the board signed off, or we could move on to the next department for signatures.
To save approximately 20% of your project cost, it is worth it to be persistent, patient, organized and humble and do the work yourself.
Prepare yourself mentally now that you will be waiting, and you will be following up, and you will need to have your ducks in a row to get your foundation permit. Your reward? Money saved and your golden ticket to building your dream home!
Warmly-
Queen Bee and Worker Bee
P.S. If you would like to read more about building permits, check out The Farmer’s Wife’s building permit timeline and cost breakdown, CLICK HERE.
Or if you are ready to move forward with owner building and save loads of money doing it yourself, CLICK HERE to read Farmer’s Wife’s Step 1: Where to start when you want to build a house
FREE checklists and schedules
Access to the resources I created that helped Farmer and I save over $75,000 building our own custom dream home.
Leave a Reply