Farmer here.
Yes, you read that right. It is my turn to write a few things since I was the one who used the EZ HANGers to install our doors while the Mrs. and kids were out.
I didn’t really know what to expect with these hangers but loved the idea of not using shims. I had already installed half of our doors and was tired of checking and rechecking plumb and level.
The package of hangers comes with an instruction sheet with interior door on one side and exterior door instructions on the other. The first door we installed with the hangers was an exterior door which kind of threw me a little bit. I didn’t really understand why you attached the hangers then loosened the screws to remove the tab and then slid them back in. I know that was over your head when you haven’t seen the hangers yet-that’s how I was feeling. I would recommend having a little experience installing doors to understand the concept if using these hangers. If this is your first time, I recommend watching videos and tutorials about these hangers.
We made our own how to install video that you can view HERE.
Also, here is the actual installation video from EZ-hang:
Interior Door Installation – EZ Hang from ezhangdoor on Vimeo.
On many of our projects we have felt the more information we have the better off we will be. We have watched many videos on certain topics that have been very beneficial and every time we are trying new things we watch multiple videos from multiple sources. Not everyone uses the same tactics to accomplish the same task and that’s ok. Find one that works for you, or mesh a few together. I found that I like these hangers more for interior doors since they do not have the trim on the outside already like exterior doors do. And honestly we ended up removing the stock trim shortly after installation anyway to put up our matching trim. These hangers also allow you to center your door in the opening a lot easier than wood shims.
Enough of that blind information. This is how these hangers work.
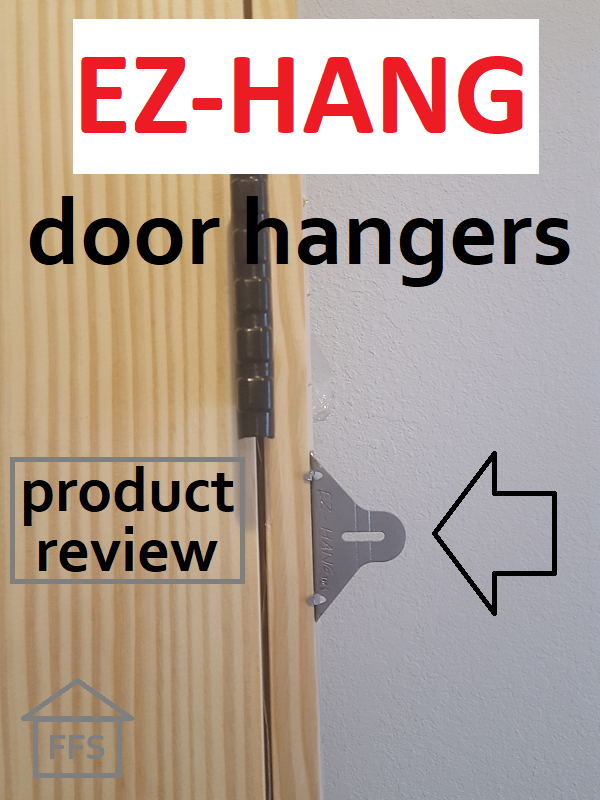
The package comes with 7 brackets which will be attached to the door frame 14-1/2″ screws 7 dry wall screws
You start by marking a vertical line on the inside wall 1/2″ in from the rough opening on the hinge side of the door. Farmer Note-line needs to be plum and run the height of the door.
Next you attach the brackets to the door as outlined on the instruction sheet. Using the 1/2″ screws and placing the brackets even with the edge of the door. (bracket has tab to help lining up with the edge of door.)
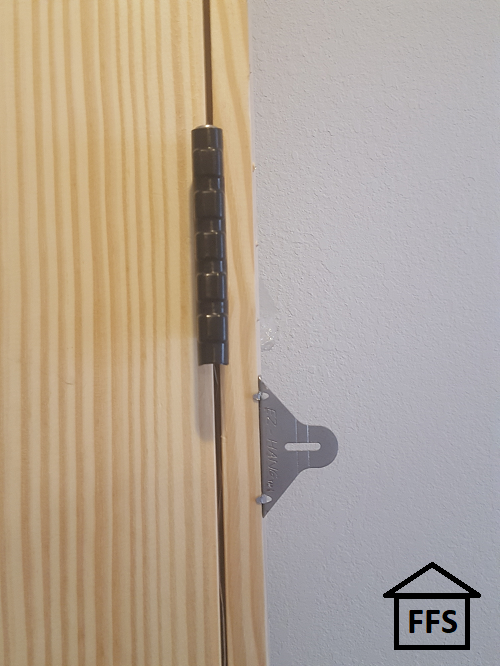 Three brackets need to be placed just below each of hinges while three others are installed on the knob side of door. The first being placed 12″ down from the top. The second 2″ above the latch hole and the third 6-8″ up from the bottom. Which is similar to your placement for shims when using them. The final bracket is to be used on the top of the door, the manufacturer recommends installing them on doors 30″ and wider.
I personally thought that was my favorite bracket because I could temporarily screw it to the wall to hold the door up while I was messing around with other adjustments.
Another Farmer Note. Know your floor before you hang your door. The installation instructions don’t tell you this, but leveling the floor/door is something that will make things easier. And if you have watched very many door installation YouTube videos you have probably seen the instructors explain how to level the door when your floor may not be level. This is important. DO IT. Not all floors are perfectly level. Stuff happens. Don’t waste time trying to fix the door when the problem is the floor. It will drive you nuts. I will film a tutorial of my own to help explain the question marks floating around in your head. **Video is now available HERE.
You can now slide the door into place. See how the hinge side hangers have lines that can match up to your mark from the beginning?
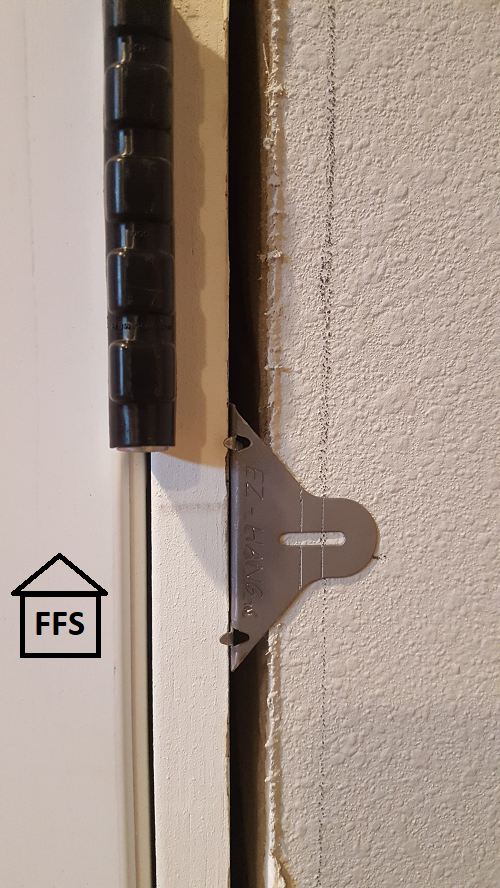 Start at the top on the hinge side and line up one of those lines and attach bracket to wall with a dry wall screw. Then proceed to the next hinge down, and match the same line on the bracket to the line on the wall. Then on to the bottom bracket. That sets your door to the plum line which in my opinion is way nicer that messing with shims. But you obviously aren’t done. You need to check the reveal on the top and knob side of the door to make sure it is the same and attach those brackets as necessary to maintain that equal gap between door and frame. This is why leveling the door/floor is so important, you would fight that for a long time.
The instructions also state that if you want you can use a second set of hangers and attach them to the other side of the door which follows a similar installation technique as when installing an exterior door. I chose to use just one set, and this is an interior door. I will explained a few differences in the video.
One more Farmer Note-the line drawn on the wall gives you what I would call a left to right plum line-it does not however give you a front to back line a.k.a. “true”.
When sliding in the door you tighten each bracket to the wall but if your wall is not front to back plum your door will not close squarely to the jam. Now you can be super careful in your framing and make sure that you have checked all of your walls to be spot on perfect, but if you have any walls that aren’t quite right you will need to be aware of that and adjust the installation accordingly.
In my case I was off by an 1/8″ and it drove me nuts as I closed the door. I was able to tap a bracket or two to adjust the lower part of my door in just a little more and square everything up.
I know- it’s a lot of information and perhaps none of it makes sense. So I say again, familiarize yourself with the verbiage, techniques, tools etc so you can feel comfortable as you install in some maybe not so perfect spaces. There is nothing wrong with making minor adjustments while installing, this does not follow the “one size fits all” mantra. Every doorway is not created equal.
To finish off I guess I need to answer the big question-Would I recommend the product?
And the answer is definitely YES. The EZ HANGers are major time and headache savers even at the increased cost over wood shims. And they don’t split. You can find these hangers for $5 a set if you only are buying one, if you plan on using them throughout your whole house you can buy a contractors box or Whole House Pack and save even more.
Once again, you can see our video on installing doors this way by CLICKING HERE.
You can also CLICK HERE to visit the EZ hang door website.
I hope that helps,
Farmer
P.S. CLICK HERE if you would like to see all the products we recommend.
FREE checklists and schedules
Access to the resources I created that helped Farmer and I save over $75,000 building our own custom dream home.
Way to go Farmer! Great job! I am only in the research phase of this journey, but already feel smarter after reading your post about the EZ HANGers! I really appreciate your wife (and you) sharing this process with all of us. I have had a life long dream of building my own house, and the information you all provide encourages me to keep dreaming big and consistently taking small steps. Thank you so much!
You are welcome Leah!
You guys are a God send. Makes me more excited than ever to keep planning and dreaming about building our home. Thank you both so much for sharing your building journey with us, the info is priceless. Congratulations on your new home and the new baby! God bless.
Thanks Markitta!