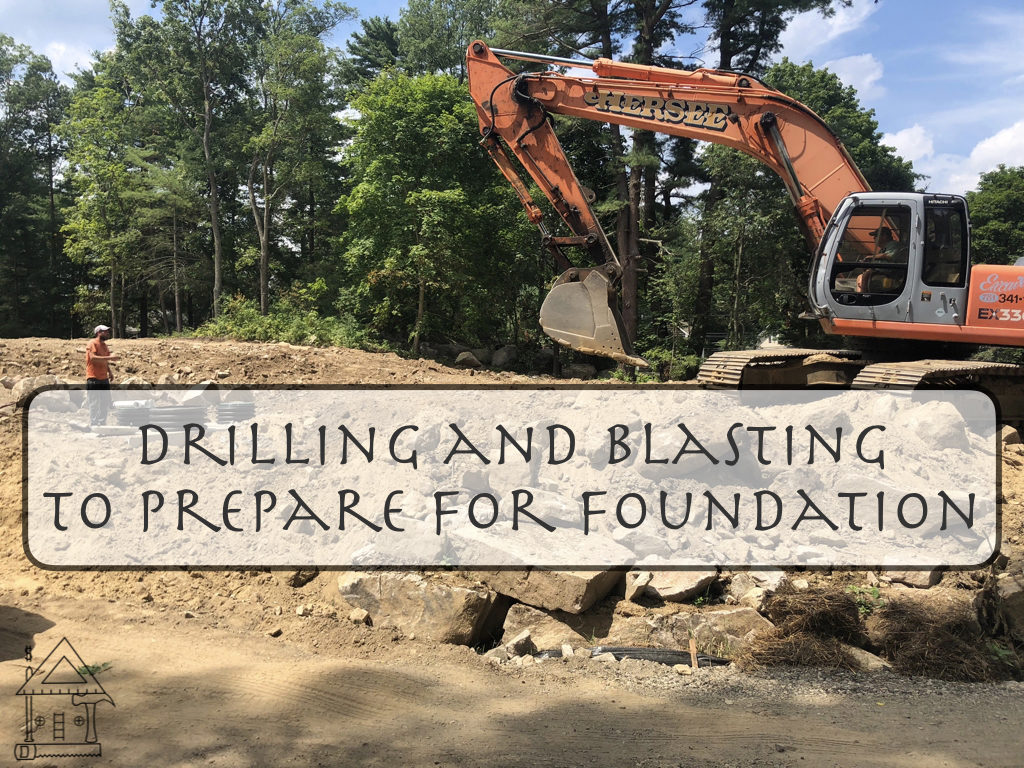
Drilling and Blasting to Prepare for Foundation.
You know that parable about the wise and foolish builders who built their houses on rock and sand? Well if you don’t, the parable goes…
“I will liken him to a wise man, who built his house on a rock. The rain came down, the floods came, and the winds blew, and beat on that house; and it didn’t fall, for it was founded on the rock. Everyone who hears these words of mine, and doesn’t do them will be like a foolish man, who built his house on the sand. The rain came down, the floods came, and the winds blew, and beat on that house; and it fell—and great was its fall.”
— Matthew 7:24–27
We unknowingly took after the wise builder and built our house directly on ledge.
Ledge refers to a ridge, a geological feature or a layer of rock…
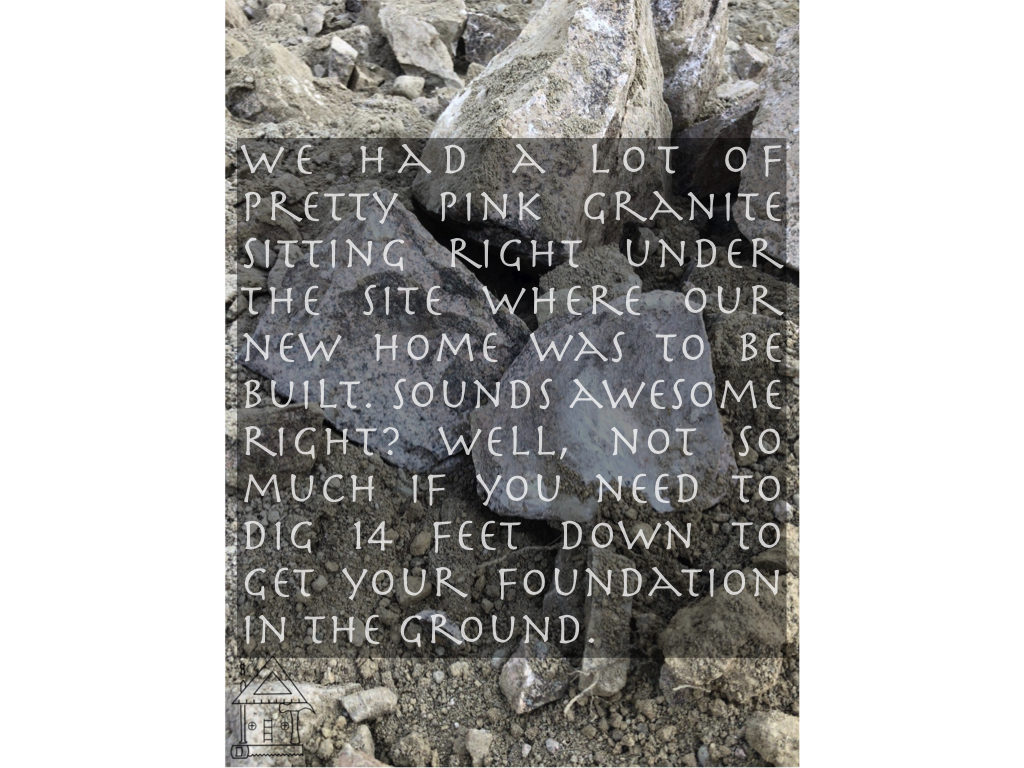
We had a lot of pretty pink granite sitting right under the site where our new home was to be built. Sounds awesome right? Well, not so much if you need to dig 14 feet down to get your foundation in the ground.
We later learned from a few contractors and neighbors that there is granite quarry not too far from us that the town used back in the 1800’s to build the train station, which still stands to this day. Isn’t it wonderful how everyone is a wealth of information AFTER you experience challenges like this?! We had a good laugh about that one.
Our excavation contractor did his best to try to break and pull up the ledge with his excavator before breaking off a couple bucket teeth and telling us we needed to either pay to have a hammer to break it up or drill and blast.
Before we freaked out, because we saw our budget get crushed before we even began building, we talked about our options with our contractor.
So what are the options here?
One method is to use a giant hammer to chip away and break the ledge. Our contractor offered this at $10,000 per week and told us it could take 3 weeks, give or take. It would all depend on how much ledge we actually needed to remove to get a foundation in the ground.
Then we would need to have the large sheets of rock removed by the truckload which was another fee. In addition to the added cost, the amount of time to get it done seemed daunting to us since we ideally wanted to get the house weather tight before the New England late fall weather set in and a permit of occupancy within six months from breaking ground.
With the unknown variance of how much ledge there actually was under the site, we did not like the sound of this option. That would have been an extra three weeks, give or take, and was not in our time budget. Plus the contractor was not guaranteeing that he could break through enough ledge to get the basement plan we desired for our foundation. This was clearly not the option for us.
We could choose to move our house from the top of the sloping lot to the bottom. This would then mean moving our septic tank to the top of the lot and having a pump system rather than a gravity system.
Plus you still have to dig enough of the area to get the septic tank and leach field into the ground. There was also no way of guaranteeing that we wouldn’t hit ledge or some other issue while excavating.
We also did not want moisture and water issues to be a problem with the water flowing down against the house. There was also the issue with the Conservation Commission and perhaps getting an approval to build the house so close to the Wetlands that is situated 100 feet from our property line.
Another option was to discuss doing away with the desired basement plan. We had our heart set on a nice big space to turn into a bonus room or in-law suite in the future.
So much of your time in New England is spent indoors during the harsh winters that the coastal storms bring. Long cold winters was something I had to get used to (being a native Southern California girl) and being trapped indoors, and we wanted to make the long dreary winter feel more bearable with extra room to spread out. So that option was less than desirable, but something we could have tried if we could have dug down for a crawl space or slab foundation.
We could not have a crawl space foundation since that is not desirable for the climate in Massachusetts, so that option was out. This left us with the potential for a slab basement. See my other article regarding the right choice for foundation in your location.
In the end we were told regardless of having a slab foundation or basement foundation we would have to dig at least 4 feet down anyways.
Yet, another option we had was walking away from the lot….but in that case, we did not know if we would get a buyer willing to take on this project after knowing the challenges that lie ahead.
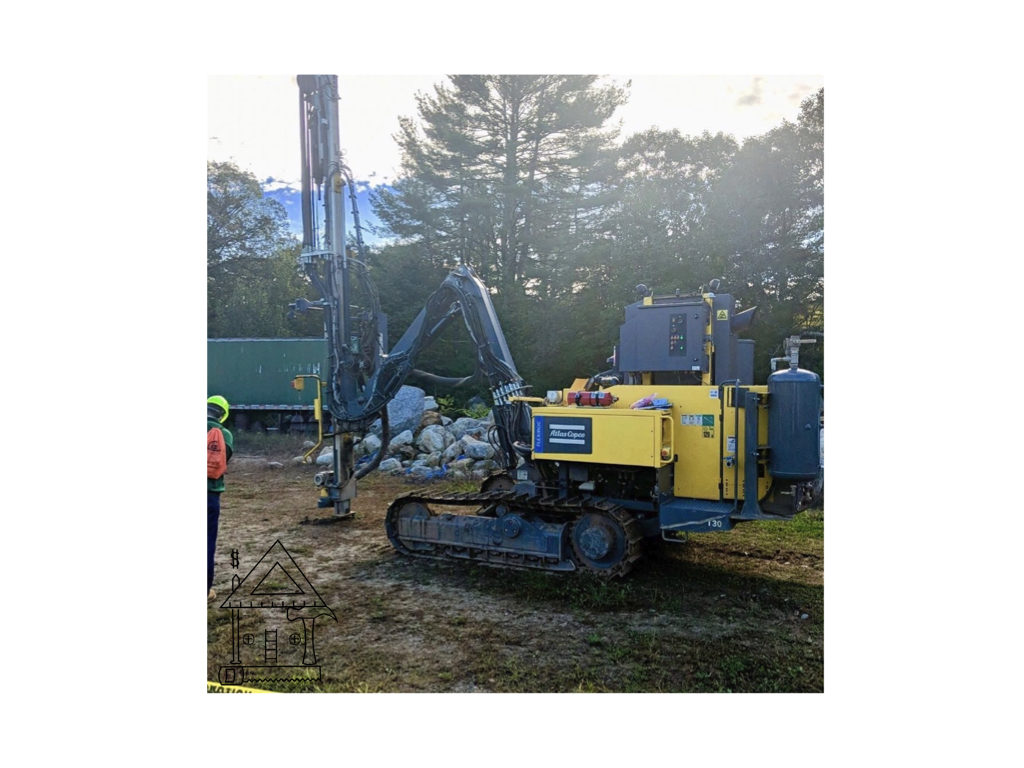
Drilling and Blasting was another option that many builders go with when faced with ledge. This is a method in which a large drill is used to make holes in the ledge. Then gravel or pea stone is filled partially into the hole followed by the dynamite.
Blasting mats are placed over the site to prevent debris from flying everywhere. Then the blast itself is initiated and the ledge is shattered into pieces easy enough for an excavator to dig up. Expensive at $25,000, and fairly quick, an extra week added to our timeline, we looked very closely at what was involved in this process.
So we chose to blast….
This is NOT something you can DIY. There are special permits and fire detail required as it is a controlled explosive. It can be very dangerous if you are not a trained professional.
Deep breath…It’s all going to be ok.
We worked quickly to get a couple quotes from two very reputable contractors with references from someone we trusted and had experience with them. They both came in very close with similar price points, the big difference for us was timeline.
The contractor we chose to work with, Maine Drilling and Blasting, was willing to get started right away versus the other contractor had to get us on their schedule a couple weeks down the road.
Remember, timeline was important for us since the fall was drawing closer by the day and we still had to get the debris removed and the house weather tight.
The project manager came out to meet with us and walk through the process after the initial proposal. That process is detailed below so you can understand exactly what goes into drilling and blasting before excavating and pouring a foundation.
- The project manager came out to the site and assessed the extent of the site and rock that needed to be removed.
- We hired a safety specialist to do a pre-blast survey on the surrounding area. This included home inspections for all our neighbors with in a 250 foot radius of the blast site. This was also a nice way for our neighbors to have a heads up that the blasting would be happening, so as not to put them on high alert during the actual blast.
- The safety specialist and an engineer sent off a test shot, this is what they call the actual ignition of a blast, and monitored seismic activity and analyzed to come up with a plan for the major blasting day.
- They then designed the blast and include the following factors:
- The size of the blast.
- The number, size, depth, width, pattern and spacing of holes.
- The sequence and pattern of explosions, since there was more than one. This was helpful for control.
- The actual amount of explosive materials needed for each hole.
- We ordered pea stone(small gravel like rocks) to go in each hole, since that is required to sandwich in the explosive material. This was $200 for the truck load we needed.
- The fire chief was notified to send out a fire detail, which you also must pay for.
- After drilling the holes for the first round of shots, the crew loads the holes with pea stone and explosives.
- Our excavating contractor then placed large blasting mats, which are recycled tires connected together with steel cable to create a 12 x 12 foot 6,000 pound mats, to keep rock and dirt and debris from flying and causing damage.
- They secured the area up until the time of the actual blast.
- The site is secured and because we were close enough to a road traffic was stopped.
- They sound the first horn or siren to notify 5 minutes to shot fired.
- They sounded a horn twice to notify 1 minute warning.
- The blaster technician detonates the shot.
- A blasting crew must inspect the site to make sure each explosive was detonated properly.
- Then a horn is sounded to signal the all clear.
- Then they drill more holes and repeat the process until the site area has been blasted according to the specifications.
See I told you, a professional is a MUST!
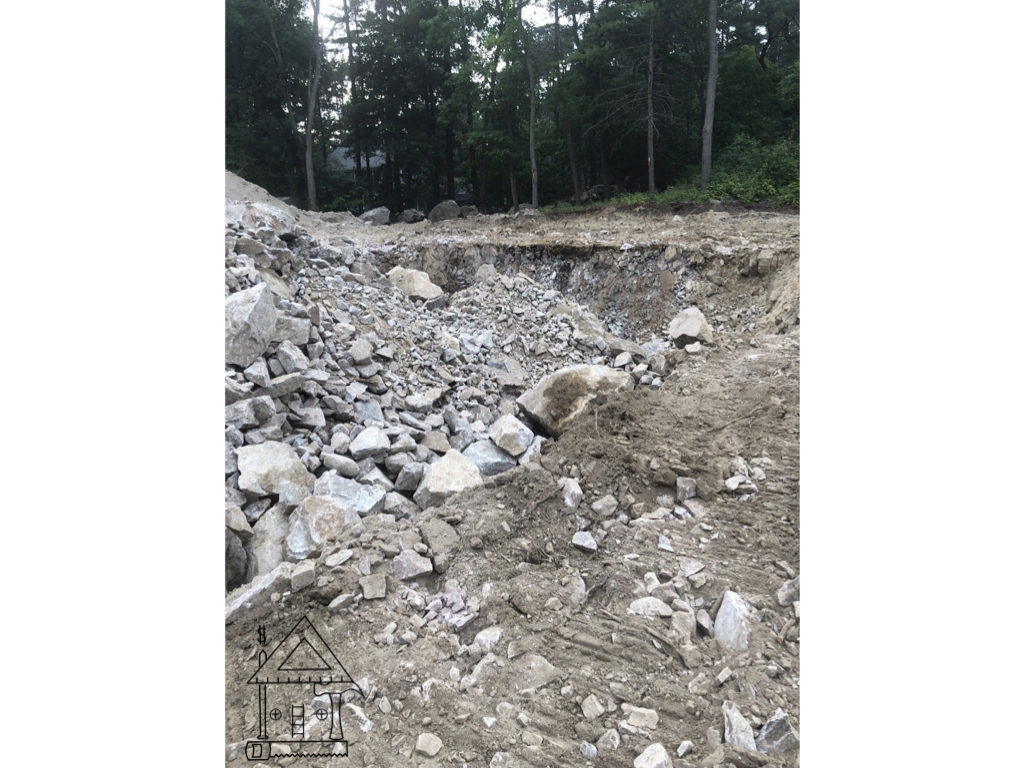
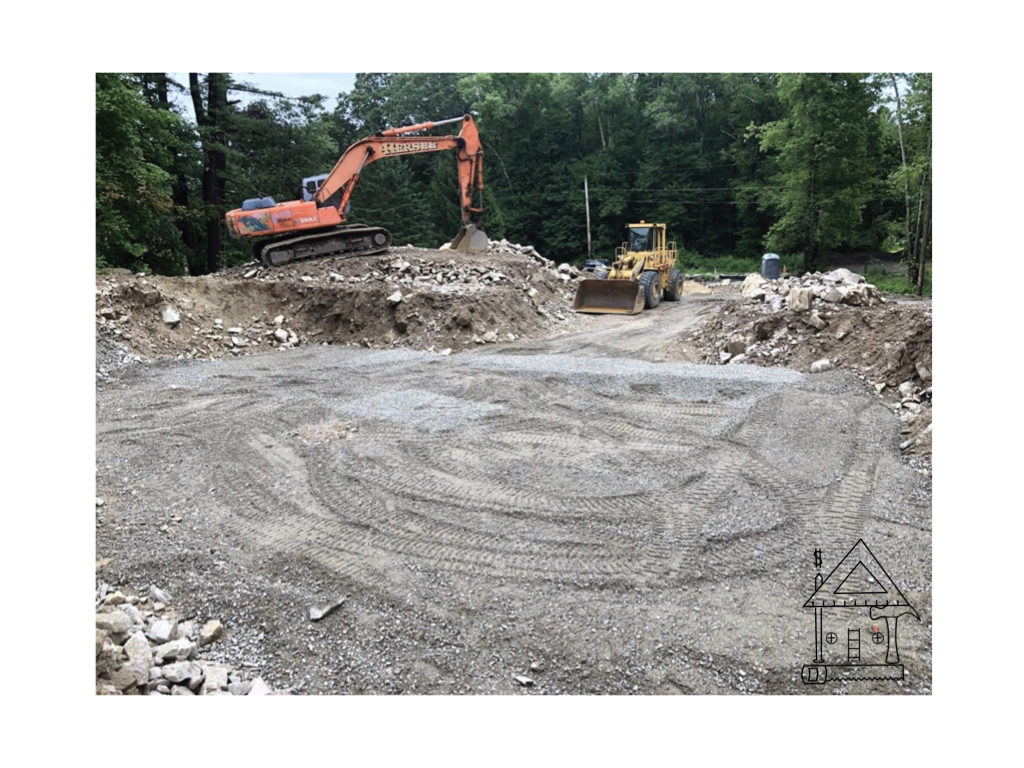
After, the drilling and blasting team were finished and the crew had packed up the drill and gone, we still had to have the 6,000 pound mats removed. Once that had been finished, our excavator needed to begin digging up rocks and earth to get our foundation hole in the ground.

This proved to be a bigger task than we thought it would be.
Because there were SO MANY ROCKS, mostly pink granite, they had to be hauled away. You can pay to have this done, but that is EXPENSIVE! Instead our excavation contractor called several landscape companies to come and take them for free. If you have chosen to find other resources, Craigslist or other online platforms are helpful and often times you’ll find someone who has a large truck that will take them away.
To pay someone to operate the excavator to dig up and load the rocks is not free though….
And then still, because we needed good suitable fill for the foundation after it was waterproofed, we had to buy material for that. We also needed stone to lay down under the foundation before the floor was poured so the drainage under the house would be good.
We could have avoided this $40,000 mistake had we done our own perc tests BEFORE buying our lot of land. See my other article regarding due diligence before buying land.
Although, I still believe it was meant to be. The location is perfect and there are only a few buildable lots available in our town, specifically in the school district we want to be in. In 15 years, Worker Bee and I will look back and laugh about this since the investment is in our forever home and a life we are building, on a solid rock foundation.
Happy Blasting!
Queen Bee and Worker Bee
FREE checklists and schedules
Access to the resources I created that helped Farmer and I save over $75,000 building our own custom dream home.
Great post.