That happy day has come and you have received word from your local building department that you can FINALLY begin digging a hole for your foundation (check out applying for building permits if you haven’t gotten to this point first). You feel like you have the golden ticket and can’t wait to get started! Digging a hole for your new dream home sounds simple as that, right? Digging a hole.
Wrong….
There are several different styles of foundation and you have to have it all planned out before getting started because the foundation of your house is one of the MOST important aspects of the building process and you MUST get it right.

Let’s talk about the different foundation types first as this is a major factor in your preparation. We did research, mostly talking with experienced contractors, on the different types of foundation to decide on what was best for our home. I recommend that you do the same for your area and type of house build.
SLAB
The first type of foundation seems the most simplistic to me, a slab foundation.
There is little needed preparation for this as the foundation is basically a flat concrete pad poured at the site of the location.
There are two major types of slab on grade foundation:
Post Tension Slab and Steel Reinforced Slab
I have seen most positive reviews on the Steel Reinforced Slab and it seems to be the most preferred by professionals. However, steel is expensive and the tension cables used in the Post Tension Slab can be a decreased cost. You will need to discuss with your engineer for your specific needs.
What is important to note is what type of soil is under the site in which your slab will be poured.
Do you have good drainage like rock or is there a high water content type of soil like clay? This is where a civil engineer comes in handy! They will bore into the ground to find out what kind of soil is beneath your foundation site.
This matters with a slab foundation because the water can seep back up through your foundation and create issues later like shifting or mold and mildew. No thank you!
If there is clay then you will need to use a vaper barrier and that will keep any moisture in the soil off your slab. The site is prepared with channels that have been dug in a grid pattern and then rebar gets laid inside those channels.
Then a grid of wire mesh is laid on top of that and the concrete is poured over both the rebar and vapor barrier which keeps the whole slab together. This will help it move as if a boat was rocking on water rather than in pieces when the soil exerts pressure. You can easily look up examples of this type of slab foundation.
Rebar is short for reinforcing bar usually made from steel, by the way.
With this type of foundation, the grade simply needs to be a level and flat area cleared from any vegetation. Depending on the needs and size of the building, the engineer will tell you how deep and wide to dig the footings into the ground. This will be done a minimum of 12 inches below frost line and at least 16 inches wide.
A footing is the construction of concrete underneath the column or wall to help distribute the weight bearing load over a large area.
This type of foundation is most often seen in parts of the south where extreme moisture and weather is not an issue. In fact, when my parents built my childhood home, this is the type of foundation that was used on the 4,500 square foot house they built on the outskirts of San Diego.
PIER AND BEAM
Type two foundation is a Pier and Beam, or Post and Beam foundation.
This type consists of concrete piers (or posts) and wood beams that are set in the ground and then foundation beams are laid across them to bear the weight of the structure. It is not recommended to use this type of foundation for large structures or those built in areas that experience flooding, hurricane force winds or earthquakes. Typically you will see this type of foundation being used for small cabins, sheds, or the ever increasingly popular tiny home. It is recommended that for larger homes a crawl space, slab, or basement type of foundation be used.
The posts must be dug into the ground a minimum of 16 inch in diameter circle or square for gravel or rocky soils, and 24 inches for loamy or sandy soils. The depth should be 1/2 the width or more.
Good soil material under the footings is of the utmost importance when using a pier and beam foundation. This is true of all foundations, but essential for pier and beam.
CRAWL SPACE
Type three foundation is a crawl space foundation. This is the type of foundation that Farmer and Farmer’s Wife used for their home in Central Washington.
This is elevated off the ground by a minimum of two feet and used widely in areas that experience water accumulation.
Although, our first home in the city of San Diego was a crawl space and we all know there is no water accumulation there. However, these types of foundation are highly recommended to prevent termite infestations, so that is my best conclusion as to why many homes in Southern California are built with a crawl space. That, and maybe they were less expensive than pouring a solid concrete slab.
The footings for a crawlspace are dug in trenches after staking the layout and digging the main foundation hole. Following similar guidelines to the other types of foundations, the depth of your footings will depend on the frost line in your area.
Next, the forms for the footings will be placed and then concrete will be poured. While the concrete is still wet, the rebar will be placed vertically so that the crawlspace walls will be reinforced when tied to the footings.
Now the walls can be formed and both horizontal and vertical rebar can be placed for reinforcement. After the concrete is poured, anchor bolts are placed and left at least 3 inches above the concrete line. This is where your framing and sill plate connects to your crawlspace foundation.
Anchor bolts are usually made up of bolts, steel plates and stiffeners to connect both structural and non structural elements to your concrete foundation walls.
To learn more about crawl space foundations, and step by step instructions on how Farmer and Farmer’s Wife did the foundation on their 4,000 sq ft farmhouse, check out these links:
Step 12: Concrete Forms for Footings
Step 13: Rebar in your footings
Step 14: First inspection and cement prep
Step 15: Pouring cement footings
BASEMENT
Type four foundation, basement, is what we chose to go with. (in Massachusetts)
Hopefully, not to confuse you even more, there are 4 types of basement foundation: concrete block, precast panels, stone or clay tile walls, and poured concrete.
We chose poured concrete structural walls since it was the one our architect recommended. It is also the most simple and sturdy choice. We have had experience with stone walls (which is what you find in older historic homes) and do not prefer this for wet weather conditions.
Since our experience is with the poured concrete foundation, that is the one we will focus on.
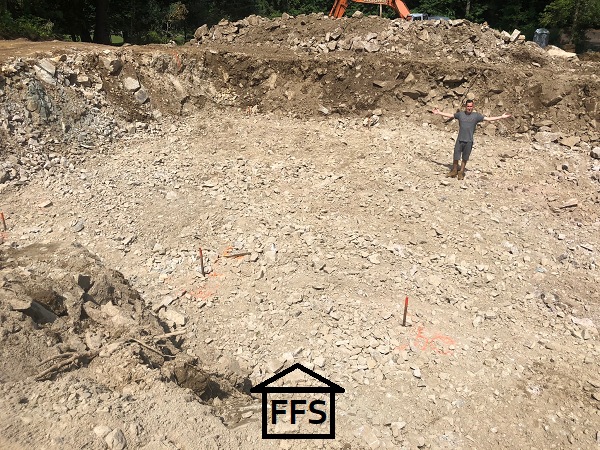
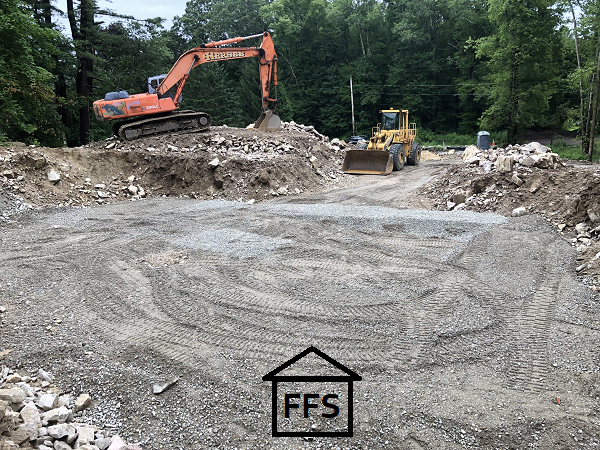
A poured concrete basement has many similarities to both a crawlspace and slab foundation. It starts with digging a hole. The excavation professional will need elevations and a location staked out by a civil engineer.
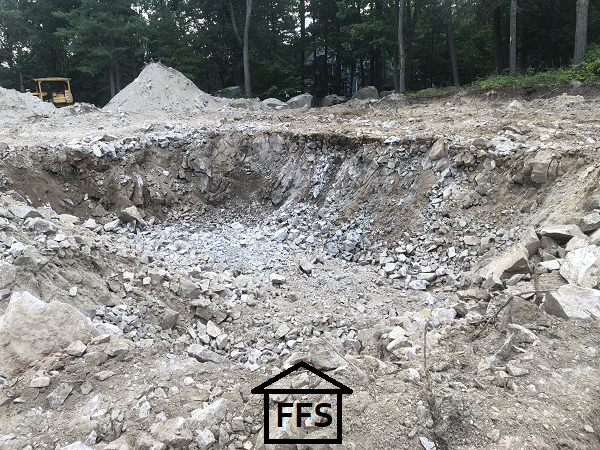
Once the location has been staked out by your civil engineer, your excavation contractor can begin digging and preparing the hole. Ideally, this can be done in accouple days as long as the soil can easily be dug up. In our case, we hit ledge …. a lot of ledge.
Ledge is a fancy word for large sheets of solid rock. We joke with each other that we may have taken the parable about the wise man building his rock too literally …
We did have to drill and blast. We did not have a choice as the rock was about four feet down. So, unfortunately no matter what (crawlspace or basement) we would have to drill, blast and remove the rock before getting the site prepared before pouring footings and the walls.
Since we had designed the house around having the extra basement space for guests, entertaining and resale value, we bit the proverbial bullet and hired a drilling and blasting contractor. More on that another time.
Preparing the site …
The excavation included the staked out foundation layout as well as a six foot perimeter around. This allowed for our contractors to be able to build the footings and work easily around the foundation.
After the hole was dug, the contractor had to lay 12 inches of blue stone. We did not have suitable material to pour a foundation on top of so it was essential for proper drainage that we have a level compact base comprised of good material.
At this point they also made sure to have soft sandy areas prepared for the gas, water, and sewer lines before the concrete slab floor was poured.
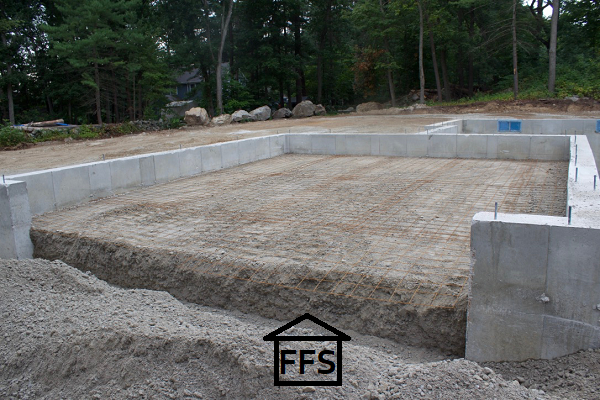
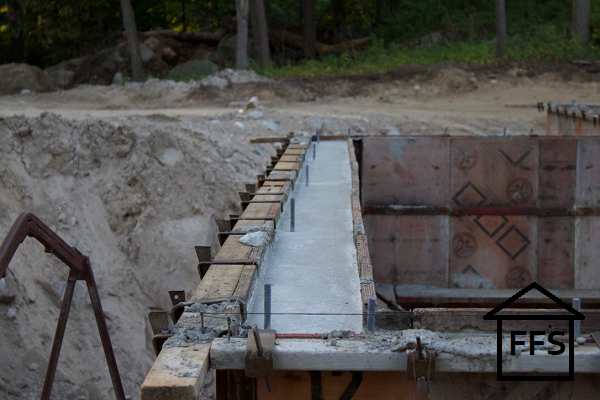
Once the site was finally ready to go, the footings were built and rebar was laid for reinforcement.
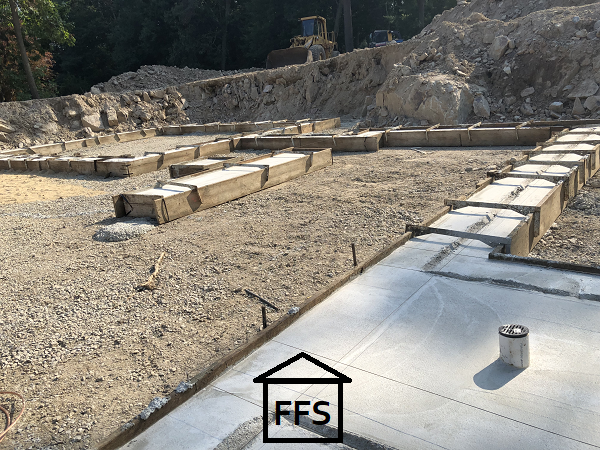
Since the hole was already dug and the whole foundation, walls and all, would be buried later, there was no need to dig trenches in the same way that a crawlspace is prepared. Then the following day the footings were poured.
Be sure your site has space for a cement truck to maneuver around the entire foundation site.
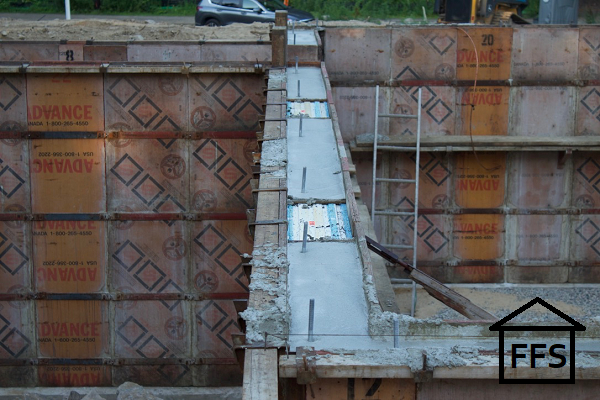
Next, the forms team built what would be the walls of the foundation from forms. Think of these as molds that sandwich in the concrete to help it dry upright. They are temporary and will be removed once the concrete sets up.
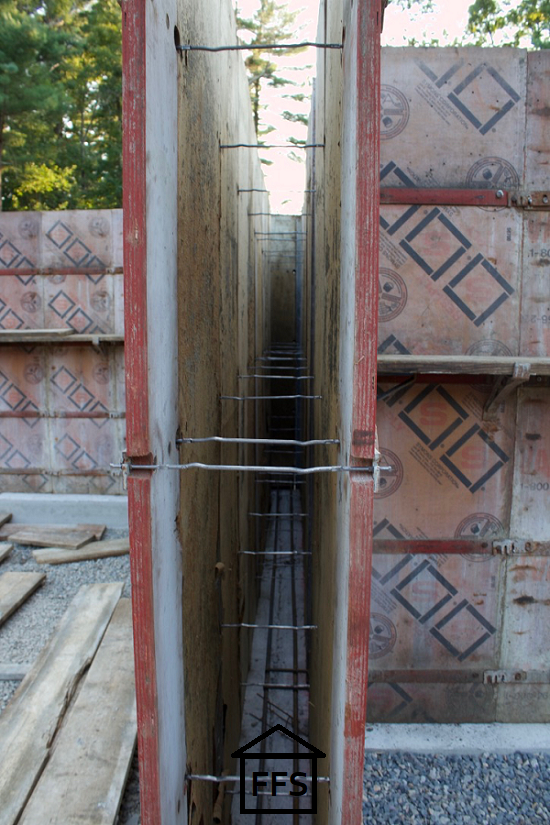
Putting up the forms took about a day. Before pouring the concrete, more rebar was placed vertically for reinforcement. To meet code, our walls needed to be a minimum of 10″ but we chose to go with 12″. This was based on the recommendation of our architect due to the load of weight that would be bearing on the exterior walls since we have an open concept on the first floor.
We also had three basement windows that needed to be inserted into the forms before pouring the concrete walls.
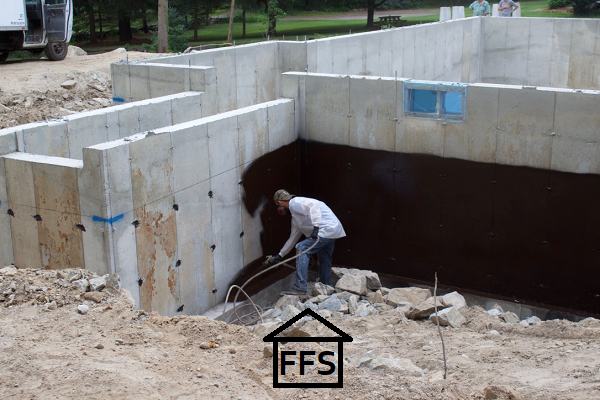
Once the walls were poured and dried, they removed the forms.
After the concrete had a couple days to dry, a water sealant is applied to the exterior of the concrete. We priced it out to buy the materials ourselves versus what it would cost to have a professional do it. The professional was less expensive and way faster.
Worker Bee said for us to do it ourselves it would have been $800. The professional did the whole thing in 2 hours and it was only $650 and they used a higher grade of sealant than what we could get our hands on at the store.
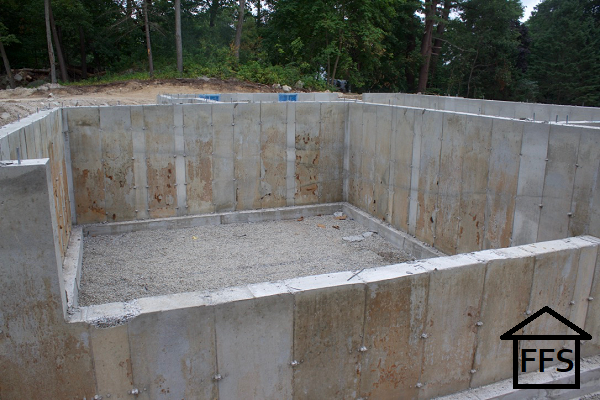
Now backfill and good material had to be brought in before pouring the floors.
Our entire garage base was filled with material that was trucked in, because our material that was excavated was all rock and not suitable for building on. The material you pour your floor on is just as important as the foundation itself.
If we were to just fill in the garage floor and around the foundation with all the large rocks we had after blasting and drilling, the floors and foundation would have settled unevenly over time and cracked. Not good!
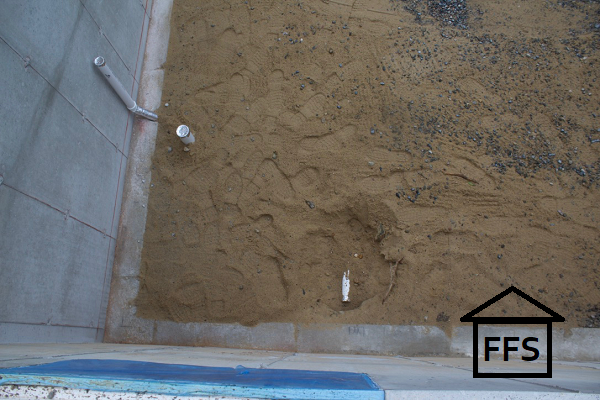
Our plumber came out to rough in the basement bathroom before the floors were to be poured. We are choosing to finish our basement at a later time, seeing as it is not a vital living space, when we have the funds available.
The work our plumber did saved us from having to cut into the concrete later when the time comes for us to finish the basement and add a bathroom.
The gas line was also trenched and brought right up to the side of the house, before the foundation was filled in with a good backfill material.
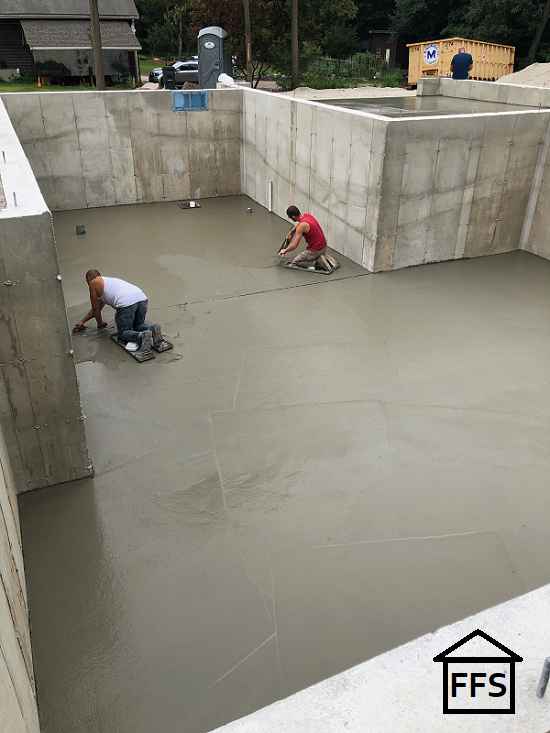
After filling in around the basement and in the garage, the concrete floors needed to be poured in a similar style to a slab foundation.
After forms, comes flats. It’s called flats because your floors are flat. We got a good chuckle out of that one.
To our surprise, the whole process only took a week. I guess that was shocking to us since the permit process took 10 months.
So to summarize:
- Pick a style of foundation based on your home design and location.
- Stake the location, either with a civil engineer or yourself.
- Excavate the earth according to the layout … leave extra space to work around.
- Check elevations and level out with suitable building materials.
- Form and pour footings with rebar reinforcement.
- Form and pour walls with rebar reinforcement.
- Remove forms.
- Run all water, sewer, and gas lines under the foundation.
- Backfill with suitable materials.
- Pour floors.
Voila! You now have a poured concrete basement foundation. Now the real fun begins and you get the satisfaction of seeing the foundation of your new home literally being laid.
Happy Digging-
Queen Bee & Worker Bee
P.S. If you are just getting started and haven’t purchased land yet, be sure to check out the 9 things you must do BEFORE buying land.
FREE checklists and schedules
Access to the resources I created that helped Farmer and I save over $75,000 building our own custom dream home.
I think it is really important to note that the best option for choosing your foundation comes with the assistance of a geotechnical engineer. By having soil testing done, you can know ahead of time what excavating is going to look like (no surprise rock haha!). Also, they engineer your foundation, so you can make sure it is exactly what you need for your specific homesite (they give you specs for your excavating and your foundation). I highly recommend not skipping this step. Foundation problems in the future can be devastating!
Thanks Nicole!