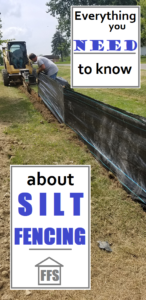
Silt Fencing: 101
Are you getting ready to break ground or have you just started digging your basement or foundation? Are you adding drainage tile or hauling in dirt to grade your property better? Maybe you were driving by a new build and wondered what is that little black fence, thinking, do I need one of those? Maybe you have gotten a call from your local city or county building department asking you to install a silt fence and your reply is, a what?
Do any of these questions sound familiar? Installing a silt fence is an important step and many construction sites need one. Here are all the ins and outs of silt fencing!
What is a silt fence?
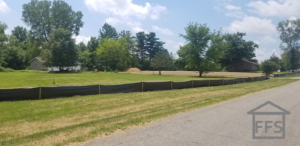
A silt fence is a temporary fence used on construction sites that protects nearby streams, rivers or lakes from storm water runoff and helps to keep dirt and debris on the construction site.
How does it work?
Silt fencing is made up of material that will slow down water, most likely storm water runoff, long enough for the dirt and sediment to sink. This keeps these materials on the construction site and out of nearby water.
When should you use a silt fence?
Most construction sites should install a silt fence when work is going on and it should remain up until grass is planted and starting to grow. This is especially important for construction sites near streams, rivers, and lakes.
Driving around in central Ohio, I have found that most new builds have a silt fence, especially when they are out in the country or on decent sized lot. We have several large housing developments in our area and they do not tend to install a silt fence unless the house is being built by a steam.
Can I install a silt fence as an owner builder?
YES! Here are the steps to follow when installing a silt fence.
1. Plan out how much and where you need a silt fence
- Things to consider include the elevation levels and waterflow of storm water. Water runs from the highest elevation down so a silt fence should typically be installed along the route water would take. Study your property, look at topographic map, or talk to your surveyor.
- We needed to fully understand the water on and around our property because the back corner of our lot and the garage that was previously built is in the floodplain. We learned a lot about our property by researching at https://msc.fema.gov/portal/home(you’ll enter your address and click on the Go To NFHL Viewerbutton. There are a lot of different layers you can explore!) and https://viewer.nationalmap.gov/advanced-viewer/.
- General rule is to plan 100 linear feet for every 10,000 sq. ft. of construction site that has any disrupted or lose dirt.
- In most cases, silt fences are installed close to the perimeter of the construction site.

2. GatherMaterials
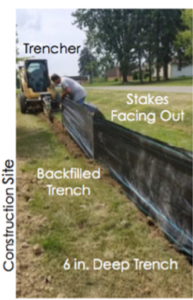
- Trencher: This could be anywhere from heavy machinery to hand tools.
We ended up using a skid- steer with the trencher attachment because we are fortunate enough to have family that has this (and because it is one of the quickest options).
If we didn’t have access to one, we would have rented a hand trencher from our local construction rental company. Price out your options, consider time as a factor!
- Silt Fence
I shopped around here. Our local home improvement stores carry it along with a large rental company in town. I ended up finding 3 of 5 needed rolls on sale at the rental company. I shopped online and made a few phone calls before heading out and saved time making stops.
We paid $73.67 instead of around $128.00 for our first 3 rolls and then $85.58 for the second two that weren’t on sale.
Every penny we save is going to add up! I have even seen some posted on Craigslist.
- Sledge Hammer
- Staple Gun
- Utility Knife
- Gloves
- Refer back to your plan as to where you need a silt fence, you may want to walk it out first and mark it using spray paint.
- The trench will need to be at least 6 inches deep.
4. Lay the fencing out and pound the stakes in
- The silt fence we used came with the stakes pre-attached. The stakes should face away from the construction site.
- You want to make sure the stakes are straight and sturdy. Pull the fabric as tight as you can working down the line.
5. Backfill the trench
- Pull down the bottom of the fencing to the bottom of the trench and then backfill the trench. Make sure the dirt is compacted.
- The silt fence we used had 2 lines at the bottom (and top) which helped guide us and kept everything relatively level.
6. Walk the fence
- We had to cut apart the fencing and reattach pieces of the fabric to a stake. A sharp utility knife and staple gun did the trick.
- There were a few spots where we had to take the staple gun and tack the material to the stake at the top.
7. Maintain your silt fence throughout the build
- Periodically walk the fence inspecting it, especially after a heavy rain.
- Check for broken stakes, torn material, or gaps and fix immediately.
FREE checklists and schedules
Access to the resources I created that helped Farmer and I save over $75,000 building our own custom dream home.
Leave a Reply