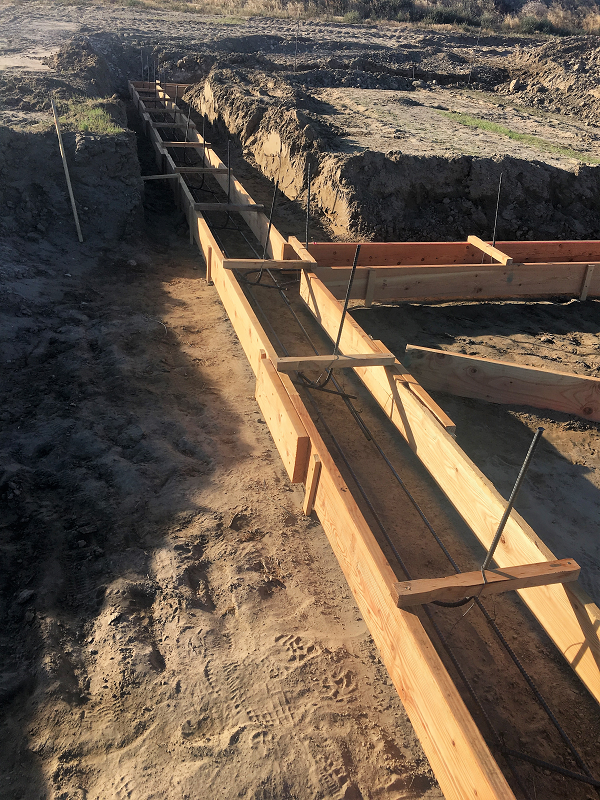
What is more important than having a strong foundation for your house to sit on? When it comes to construction, that answer might be nothing. So once you are finished building the forms for your footings, you will need to put rebar in them.
I knew what rebar was before we started building because we use it on the farm. However, I probably wouldn’t have otherwise. So for those of you who may not know exactly what rebar is, here is a picture.
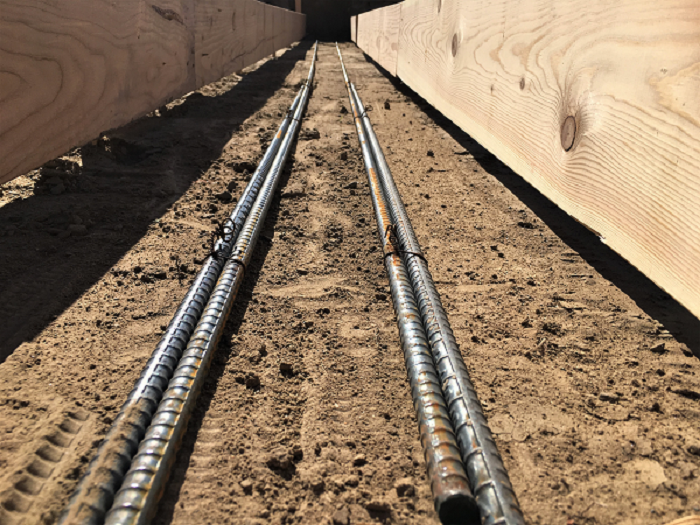
It’s a long thin piece of metal that can be bent or cut into the shape you need. It is often used in cement to help strengthen it and prevent it from cracking. The stuff we used was 1/2″ in diameter, which I was told is pretty standard.
Honestly, when we started, I thought rebar was stupid. I couldn’t understand why we needed to hassle with it. But now that I can see the finished product, it’s obvious how helpful rebar is in holding everything firmly together. Good thing we didn’t follow my opinion!
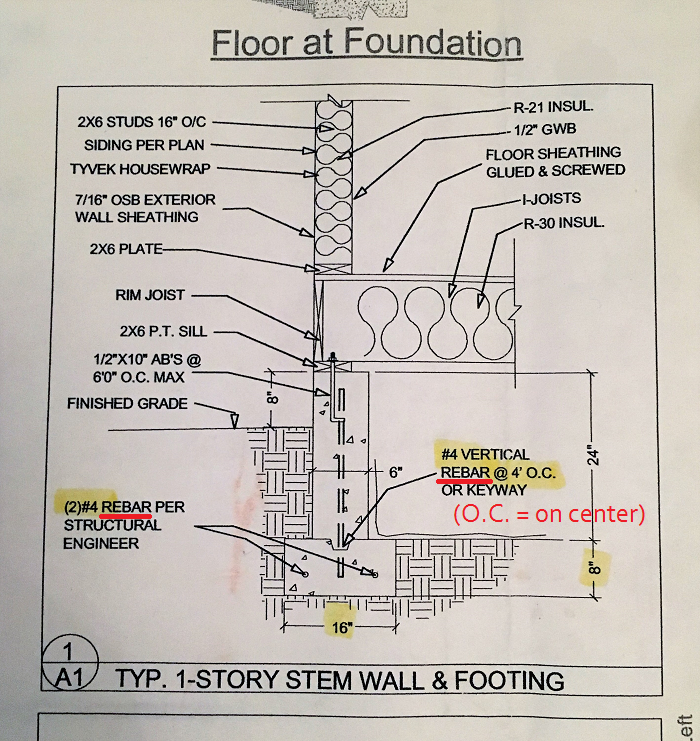
Look at your plans closely to see how much rebar you need and where you need it. I should have known it was super important by how specific the instruction were. Our blueprints told us what size to use, how far apart to put it, and that the whole thing needed to be continuous, meaning there can’t be gaps where you end one stick of rebar and start another. Here is what it looks like on our blueprints: I added the red to show you specifics.
We had to buy A LOT of rebar. In fact, we had to have a extra delivery or two of it because we kept thinking we could get by with what we had and then couldn’t. But, then again, our foundation footprint is about 5,000 square feet. The rebar had to go all the way around the outside continuously, twice! Plus we had a foundation wall around our deck, and another small one sticking out into the middle. Not to mention the fireplace foundation needed rebar, and all of the spot footings that we dug into the dirt.
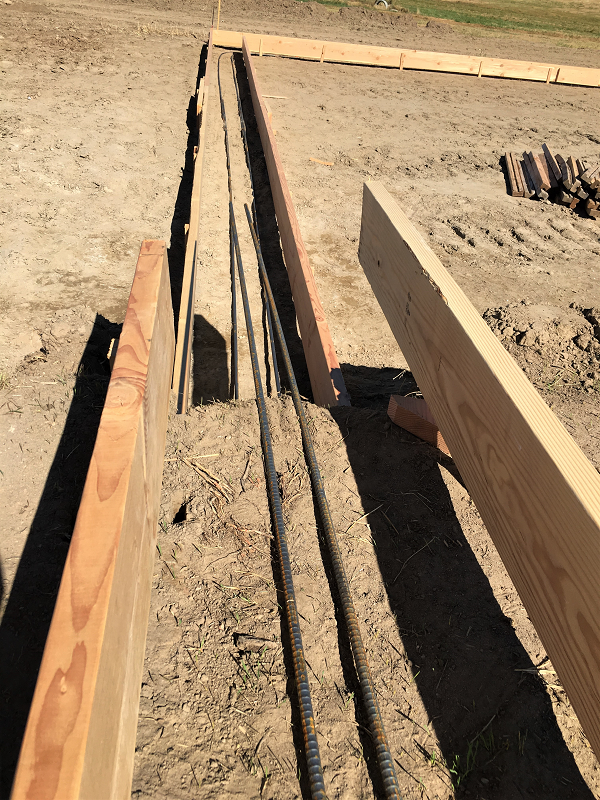
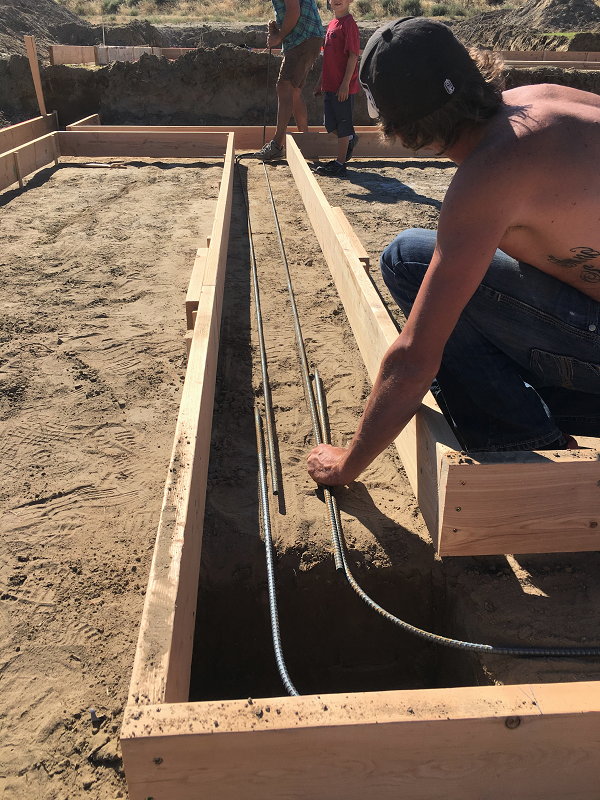
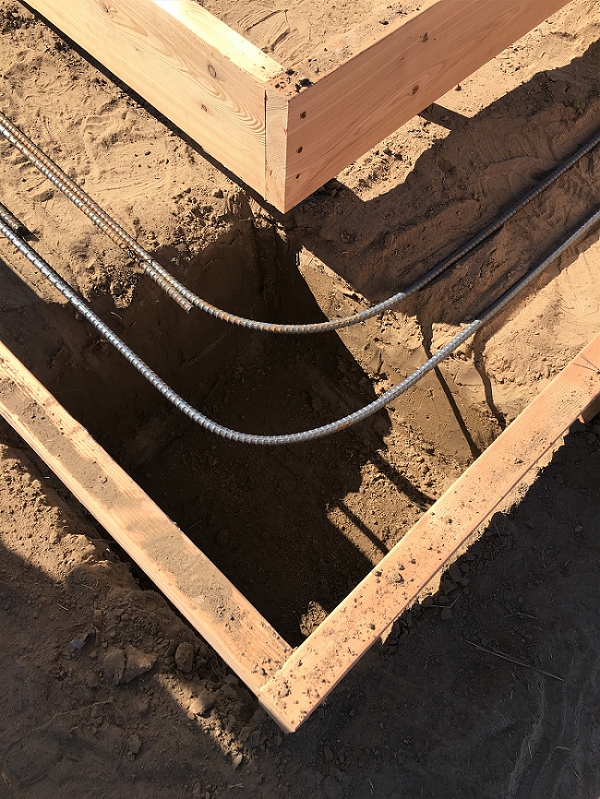
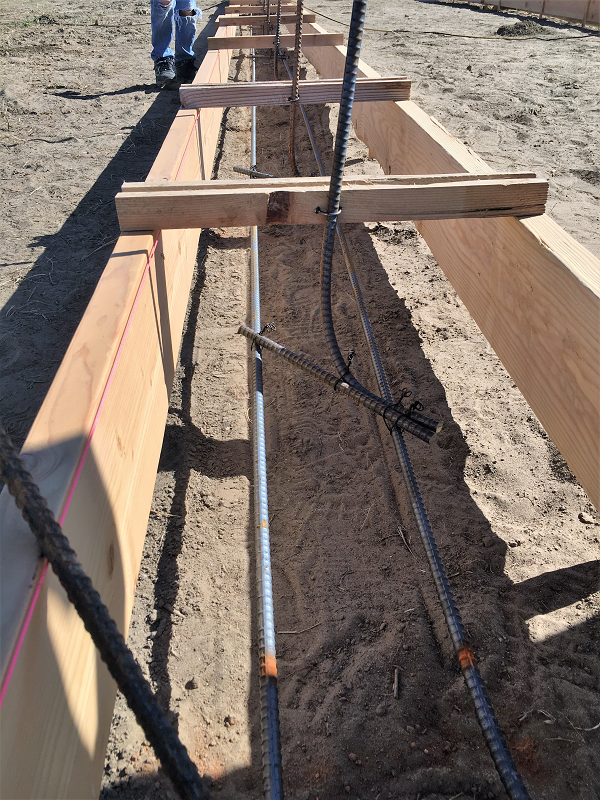
After filling our footing forms with rebar, we then had to have pieces sticking straight up every four feet, which would connect the cement footings, to the foundation wall that we would pour a few days later. Basically anywhere you put cement walls, you need rebar through it for extra strength.
It is an excellent idea to call your inspector if you have questions about the requirements in your area. We called ours a few times to make sure we knew the specific things he would be looking for. Some of the requirements for our house were:
- Rebar can not be touching any earth
- Rebar must be at least 2 inches from the bottom and the sides of the forms
- Rebar must be continuous throughout the whole thing, overlapping each other where one piece ends and another starts
- Rebar can not be sitting on metal chairs (we had to use bricks, plastic, or suspend it to hold it up off the ground)
A certain amount of rebar will be needed according to how much cement you are pouring. If your foundation is larger or wider than mine, you will need more rebar. If it is smaller, then you will need less. You will need to look at your plans to see how much rebar is required for you.
In some instances, no rebar will be required at all. If that is the case, you can either leave it out like it says, or you can choose to put some in for extra strength.
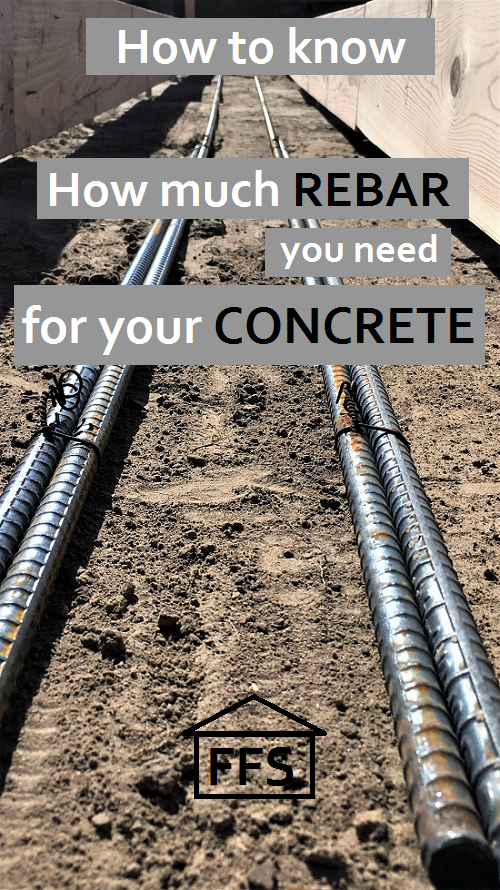
So how do you know how much rebar you will need?
If you got a materials take-off for your project, like I suggested in Step 8 then you should have a pretty good idea about how much you will need. The person/computer program who did the take-off will have figured it out for you.
We used one of our take-offs as a guide for what to order the first week or two. We quickly discovered that we were short on almost everything we ordered. We ended up having to order 10-20% more of each thing. That was a problem for a little while, and I was disappointed in our take-off. However, once we started ordering extra of everything, we were pretty close to the actual amount that we needed.
One of the biggest downsides to this situation was that our price was incredibly inaccurate. Since we were quoted $50,000 in materials, but we were having to order considerably more than that, our quote should have been more like $60,000. It made it harder to plan on material prices, and frustrating because we had to adjust our budget.
A month or two into our build, I was pretty disappointed with the lumber company that we went with and switched over to my second option. Just remember things like this may happen, which is why you need to spend the time looking at several companies before deciding who to go with. If you have a problem, then you will know what your best alternative is.
If you did not get a materials take-off, you will need to measure, or look at your blueprints, to decide how much rebar you will need. You may want to do this even if you got a take-off, so you can double check the numbers and order the right amount the first time.
I will use mine as an example. We were required to run two lines of rebar, continuously, through our footings. So I need to add up how many feet of footings I have. Measure the length of each wall, and then add them all together. I had 490 lineal feet of footings. Then I multiply that by 2, because I need two lines of rebar through the whole thing. In total, I need 980 feet of rebar.
I also have 30 spot footings. Each footing needs 4 pieces of 18″ rebar in it. So each 2′ x 2′ spot footing needs 6 feet of rebar. 6 x 30 = 180 feet of rebar for my spot footings.
Additionally, my blueprints tell me I need to put a 4 foot tall piece of rebar, sticking straight up, every 4 feet. I had 490 lineal feet of footings, divided by 4, which equals 123 pieces of 4′ rebar. 123 x 4 = 492 feet of vertical rebar.
If I add all of those totals together I get 980 +180+492= 1,652 feet of rebar. Give yourself a 15% cushion for overlapping and for cutting and you get a grand total of 1,900 feet of rebar.
Rebar is often sold in 20′ lengths, so I would need to order 95 lengths of 20′ rebar for my project.
Now you know how much rebar you need for your footings. You may want to figure out how much rebar you will be using in your foundation wall at this time too so you can order it all at once. Usually that saves a little time and delivery/travel expenses.
Rebar is a fairly large expense. It’s worth it to price shop rebar. I found cheap rebar, but it was over two hours away. So I called the nearest Lowe’s and asked them if they would price match. They happily agreed to lower their price. The funny thing is we didn’t end up ordering through Lowe’s because later we found a company that was only slightly more expensive but they would deliver it for free. That is just one more example of the benefit of taking as much time as you need. Don’t rush yourself, there is almost always a better deal or better service to find if you keep looking.
What supplies you will need when laying rebar
Besides the rebar, you will need a few other things for this step:
- wire
- wire cutters
- wire rebar ties
- wire twister
- adobe bricks or plastic rebar chairs, unless you are suspending all of it
- a way to bend your rebar
- a chop saw with a cut off wheel (one that will cut through rebar)
To keep our rebar off the ground, we suspended it with wire. We put a scrap piece of wood across the top of the forms. Then we tied wire around the rebar and twisted it around the scrap wood so it hung right in the middle.
You can’t use metal rebar chairs to set the rebar on, we found that out the hard way. They rust which can cause damage to the rebar in your foundation. Bad, bad, bad.
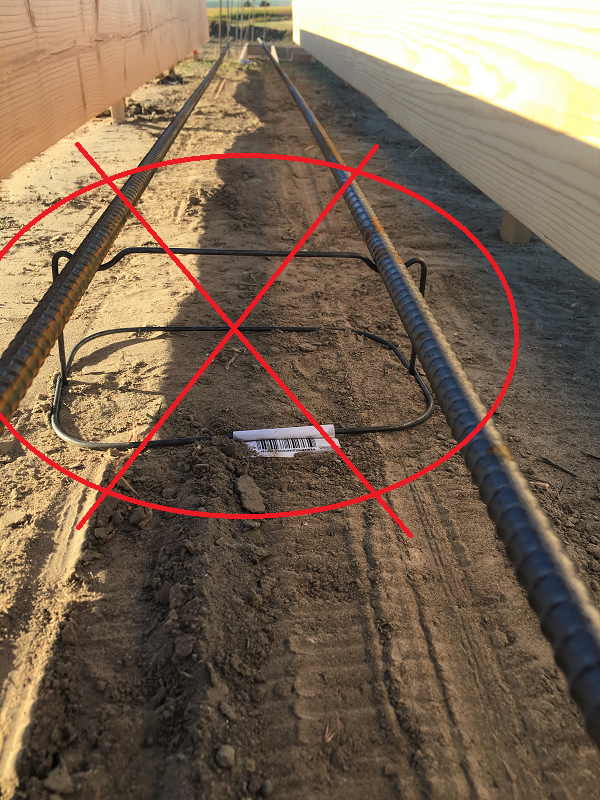 We didn’t even try to use the plastic rebar chairs after that, we just found some old bricks because the inspector told us that was a good option, and because we had broken bricks laying around anyways. We needed these for the spot footings because we didn’t have any way to suspend the rebar. It was really easy just to set our little square of rebar on top of two bricks.
Once you have all your supplies, it’s time to start laying your rebar. Now, I need to point out that we did things a little different than we would have done it, because of how many people we had. We thought we were only going to have three or four people there when we poured our concrete. Because of that, we needed to have all of the rebar set before we started pouring. It would take all of our attention to get the concrete poured, leveled, and smoothed (not the correct words, I know). We couldn’t be worrying about setting pieces of rebar in while it was still wet. So we tied every piece of rebar up in preparation. If we had two or three extra people, we could have gone around while the cement was still semi wet, and poked in the pieces of rebar that needed to stick up out of our footings. You will see what I am talking about when we you see the cement pictures.
- Start in a corner and lay two long strips of rebar on the ground, parallel to each other, a few inches apart. Continue the lines by laying two more strips of rebar down at the end of them.
 Overlap the rebar by 12-18″ so you can tie the two pieces together.
- When you come to a corner, you will need to bend the rebar.
 Measure first, so you know at what spot you will need to bend it. You can borrow, rent, or buy a rebar cutter/bender for this, but we found there were many ways to get creative about it.
 The easiest way was to use a hole on the tractor bucket or a metal flatbed trailer that we had at the house site. Poke the rebar through the hole to the spot you need it bent. Then walk it around, using the solid metal to hold the other side in place. If you have something sturdy to bend it against, it isn’t all that hard to do.
- Continue laying out your two lines of rebar all the way through your footings. If you have dead ends, or places that need to be cut, use a chop saw with a cut off wheel to slice through the rebar. It gets REALLY hot when you are cutting it so be careful. We ended up with a little pile of melted rebar shavings underneath our chop saw and even started the weeds on fire once where it was sitting. Just be aware.
- Once you have all your rebar set out you can tie it all together wherever there is a break. They make special little wire ties with loops on each end and a wire twister tool to make this job much easier.
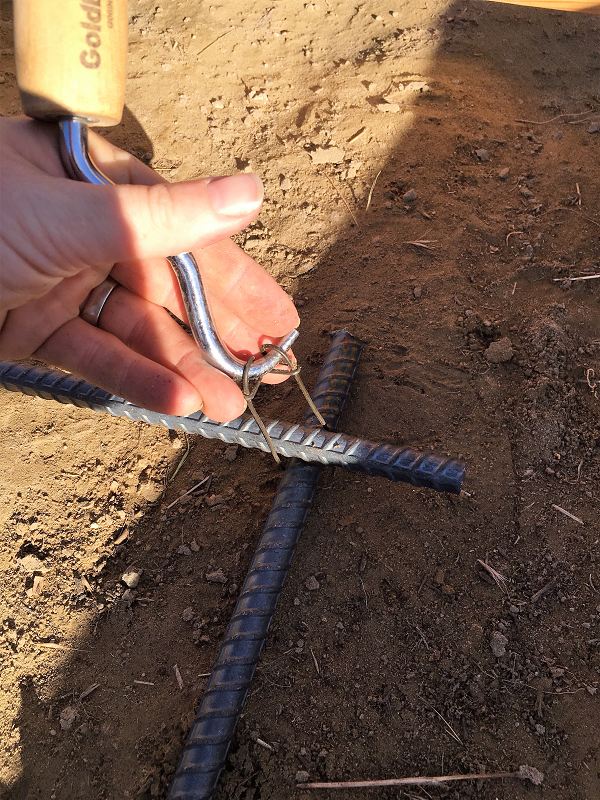 They are a little more expensive than a roll of wire, but it cuts out a ton of labor time. Take a wire tie, and bend it around the two pieces of rebar. Stick the hook of the wire twister through the holes at the end of the wire tie and twist it around and around until it is tight. Do this until all of the rebar is tied together. We used A TON of rebar ties…. like over 1,000. Buy them in bulk!
 - You should now have two continuous lines of rebar through all of your footing forms. Your next step is to set it on something or suspend it. It has to be two inches off the ground. You can buy little plastic rebar chairs to set it on, or you can buy adobe bricks to set it on, or you can suspend it with wire like we did. You will need something about every 4-6 feet because the rebar bows down in between. If you suspend it with wire, you will need to screw a piece of scrap wood across the top of the form to tie your rebar to.
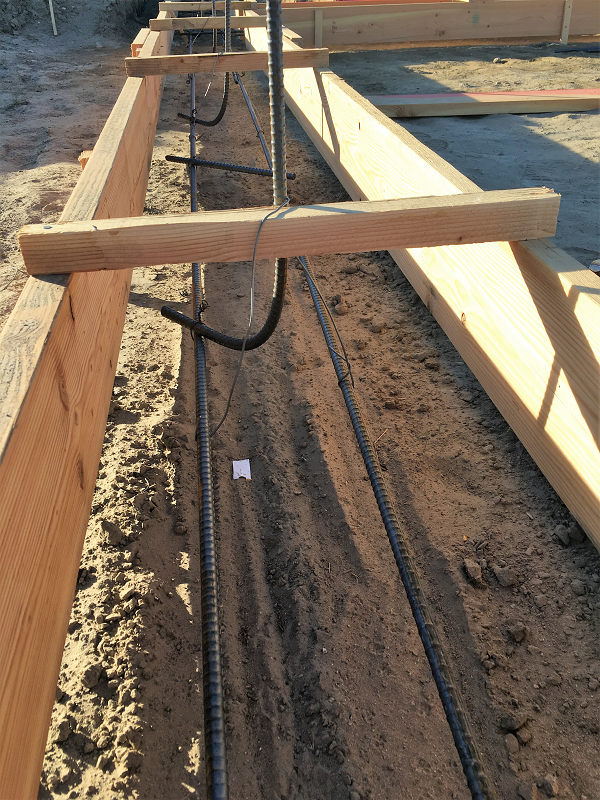 This is where the wire and the wire cutters are used. You can’t use the little wire ties because they are only about 4 inches long. Place the scrap wood pieces every 4 feet apart so you can use them to tie the vertical rebar to in the next few steps.
 - Now you need to cut a whole bunch of pieces for your vertical rebar. We needed some 4 foot pieces for the tall part of our foundation and some 2 foot pieces for the short part of our foundation. You will need to look at your blueprints to determine what your house needs.
- Bend the bottom few inches of each of these pieces so it will “grab” the concrete and not just slide right out. Then set them out every 4 feet where they will need to go. (The bent part will go down when you tie them into place)
- Use the wire ties and the wire twister to secure the vertical rebar to the horizontal rebar and to the scrap wood. It should be right in the middle of the footings, and it should be standing straight up. In some places we used a nail to hold the rebar into place by bending it around.
 Everything will probably be looking pretty silly at this point. At least that is what I thought!
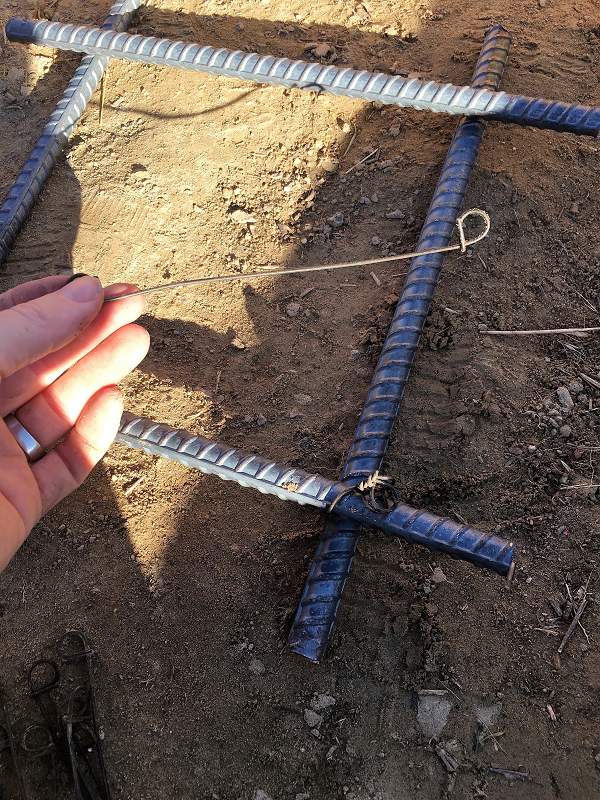
- The 2′ x 2′ spot footings need rebar also. Cut four 18″ pieces of rebar for each hole.
 Lay them out like a number sign (#) and tie them together at the corners.
 - Set two adobe bricks down in the holes (we actually broke ours in half with a hammer), and place the rebar square on top of it. Make sure the rebar is not touching the side walls.

This may sound a little overwhelming, but it’s really quite simple if you understand what you are doing. That is why I highly suggest signing up for the videos and tutorials page. To see what this looks like on video makes it much easier to understand. Before seeing the guys do this on my house, I never would have known what to do. Now that I have seen it once, it is definitely something I feel like I could do myself. We won’t ever build another house, but if we did, laying the rebar would be on my list of things to do ourselves. It’s that simple!
Cost Breakdown:
Rebar …………………………………………………………..$593.75
Ties and twister …………………………………………….$50.00
Adobe bricks ………………………………………………..$15.41
We already had wire, wire cutters, and a chop saw in the farm shop so those came out to $0
Labor ………………………………………………………….. $1,536
Total ………………………………………………..$2,195.16
If you are interested in a complete cost breakdown of our house so far you can download it for FREE right here and get access to all of my other FREE checklists, schedules, and printables.
Time:
I had Josh and Matt (professional construction guys) working on this full time for 4 days.
Farmer and I and the kids were in and out a lot. He did some tractor work moving things around. Little Man (7) helped a lot moving rebar and running tools around. Sweetie Pie (5), Boss (2), and I set the adobe bricks and cleaned up trash. I also ran to town at least twice to grab supplies we were short on.
The title of this post says days 7-12 because it includes a Saturday and a Sunday that nobody worked.
If we had done it all ourselves, I am guessing it would have taken us two weeks. Farmer counts as a whole person, but I only count as half since I spend a great deal of time running kids to the bathroom or digging rocks out of Munch’s (1 year old) mouth.
I am glad we had Josh and Matt there to walk us through this since it was our first time. If we ever did it again, Farmer and I would do this part ourselves. It’s not hard if you know what the requirements are and you understand what you are supposed to be doing. It would have taken longer, as most things do if you DIY them, but it would have saved us the $1,536 in labor.
The one setback we had was that I bought metal rebar chairs. We set them all in place and then found out that they couldn’t be used because they rust out. So we had to take them all out, clean them off, return them to the store, and come up with a new plan. Thankfully we were able to return them all for a full refund, but it did cost us some valuable time.
Now that all the rebar is set in place, you can get prepared for concrete. Yay!
Do you need to go back to Step 12? CLICK HERE
Or CLICK HERE to move on to Step 14
Be sure to sign up HERE for the videos and tutorials page if you haven’t already. You can see a video of the footings and rebar layout now, and next up is standard cement truck vs pump truck pro’s and con’s.
As always, if you have any questions please leave me a comment or shoot me an email. I want to help you build your dream home and save thousands too!
~Farmer’s Wife
FREE checklists and schedules
Access to the resources I created that helped Farmer and I save over $75,000 building our own custom dream home.
Very helpful set of instructions.
Oh my dear God, I am an civil engineer and I can’t believe I’m reading this 😑 people, don’t do it that way. Ask an expert for help! There is a pleanty things You miss and pleanty things You don’t understand. Uuuuuhhhhhh :///
Awesome! I love it when we get to hear from professionals who are willing to share their way of doing things!
We did have a professional overseeing this part of our build, and we had it all inspected before pouring our footings, so it turned out just the way it was supposed to.
We would all love to hear from you about the way you do things though! Sometimes it’s hard to find professionals eager to share their knowledge with everyone, so thank you!
Just a little fyi: Cement is an ingredient of concrete. It is typically measured as a ratio of water- somewhere around 0.45 to 0.50. For continuous footings such as yours, I’d expect a water-to-cement ratio of 0.45 to be used.
Thanks Rusty!
I am also a Civil Engineer. Don’t listen to that crazy liberal, you did just fine. Good work! Might give me the confidence I need to start my build with 2 little ones. lol